
- 开源项目之 AgentForge 发布到 Maven Central 官方仓库实战:命名空间选择与自动化发布
- 一、背景与问题
- 1.1 为什么要发布到 Maven Central
- 1.2 我们遇到的问题
- 二、核心概念
- 2.1 发布 Maven Central 的硬性要求
- 2.2 groupId 命名空间的两种来源(方案对比)
- 方案一:基于 GitHub 账号 —— io.github.<username>
- 方案二:基于自有域名 —— 反向域名
- 两种方案对比
- 2.3 本方案的选择
- 三、整体方案设计
- 3.1 发布哪些模块
- 3.2 发布链路
- 3.3 是否需要脚本?
- 四、前置准备(账号 / 域名 / 密钥)
- 4.1 注册 Sonatype Central Portal
- 4.2 添加并校验命名空间 cloud.changlu(自有域名路径)
- 4.3 安装 GPG、生成密钥并上传公钥(含常见失败排查)
- 4.3.1 按操作系统选择安装方式
- macOS
- 路径 A:Homebrew(当前受支持的 macOS)
- 路径 B:MacPorts(旧版 macOS 推荐,可用二进制包)
- 路径 C:GPG Suite(图形化快速方案)
- Linux / WSL
- Windows 10/11
- 什么时候才需要 Command Line Tools
- 4.3.2 验证 PATH 并配置 pinentry
- 4.3.3 生成密钥对
- 4.3.4 查看并记录 KEY_ID
- 4.3.5 本地签名与验签(发布前必做)
- 4.3.6 上传公钥并从服务器反查
- 4.3.7 备份私钥和 ownertrust
- 4.3.8 完整验收清单
- 4.3.9 常见失败与排查
- 4.4 生成 Portal User Token
- 4.5 配置 Maven settings.xml
- 五、工程构建改造(POM)
- 5.1 根 pom.xml
- 5.2 agentforge-ai-parent/pom.xml 补齐元数据
- 5.3 agentforge-ai-parent/pom.xml 增加 release profile
- 5.4 版本号策略
- 5.5 本地验证第五步(不签名、不上传)
- 六、实战发布与一键部署
- 6.1 步骤 0:创建一键发布脚本
- 6.2 步骤 1:进入仓库并设置本次发布参数
- 6.3 步骤 2:发布前自检
- 6.4 步骤 3:一键预演(不上传)
- 6.5 步骤 4:一键上传(首次推荐)
- 6.6 步骤 5:Portal 核对与 Publish
- 6.7 步骤 6(后续版本可选):一键自动 Publish
- 6.8 步骤 7:发布后验证
- 七、常见问题与注意事项
- 八、总结
- 参考资料
开源项目之 AgentForge 发布到 Maven Central 官方仓库实战:命名空间选择与自动化发布
把 AgentForge 的库模块以正式版
1.0.0发布到 Maven Central,让使用者可以直接通过 Maven 依赖引入。
在做开源项目时,我们常常会遇到这样一个具体问题:项目在 GitHub 上跑通了,别人想用却不知道该怎么引入。要么 git clone 后自己 mvn install,要么把 jar 传来传去,体验非常差。最优雅的方式,是把它发布到 Maven Central 官方仓库,使用者只需要在 pom.xml 里写一段依赖坐标即可。
AgentForge 的模型层与 Agent Runtime 已经具备发布条件,于是我们决定把它正式推送到 Maven Central。整个过程中,第一个拦路虎就是 groupId 命名空间该怎么定。本文就把这段完整实践记录下来。
一、背景与问题
1.1 为什么要发布到 Maven Central
- 使用零门槛:使用者只需声明依赖坐标,无需 clone / 编译;
- 生态认可:能被 IDE、依赖平台(如 mvnrepository)索引,属于开源项目的"正式身份";
- 多项目复用:配合 BOM 统一版本管理,便于后续模块化演进。
1.2 我们遇到的问题
给 AgentForge 发布时,坐标命名(groupId)是绕不过去的第一关:
- 早期项目里用的是
com.changlu.agentforge; - 但 Maven Central 要求 groupId 必须是你能够证明"拥有 / 控制"的命名空间,
com.changlu反推域名是changlu.com,我们并不拥有它,校验会被驳回。
那么问题来了:个人开源项目的 groupId,到底该怎么取? 这就是本文要先讲清楚的核心概念。
二、核心概念
2.1 发布 Maven Central 的硬性要求
在动手之前,必须先知道 Central 对上传构件做了哪些校验。它不是"上传就完事",而是要求同时满足:
- sources jar + javadoc jar(非
pom打包模块必须提供); - GPG/PGP 签名:每个文件要有一个
.asc签名文件; - 校验和:
.md5/.sha1必需(.sha256/.sha512可选),由发布插件自动生成; - POM 必需元数据:
name、description、url、licenses、developers、scm; - 版本号不能以
-SNAPSHOT结尾。
重点:以上任何一条不满足,发布都会在 Portal 校验阶段失败。本文后续所有配置,都是围绕这 5 条来做的。
2.2 groupId 命名空间的两种来源(方案对比)
对于个人 / 小团队项目,groupId 命名空间常见有两条路:
方案一:基于 GitHub 账号 —— io.github.<username>
- 规则:
io.github.myusername,例如io.github.changluya; - 校验方式:无需域名,Sonatype 要求你在对应的 GitHub 账号下,创建一个 Portal 指定名字的公开仓库来证明账号归属,验证通过后删掉即可。
方案二:基于自有域名 —— 反向域名
- 规则:拥有
example.com就用com.example;拥有changlu.cloud就用cloud.changlu,还能继续加项目子空间cloud.changlu.agentforge; - 校验方式:在该域名 DNS 添加一条 Portal 给出的 TXT 记录。
两种方案对比
| 维度 | 方案一:GitHub io.github.<username> |
方案二:自有域名反向 |
|---|---|---|
| 校验方式 | 建 GitHub 公开仓库 | 加 DNS TXT 记录 |
| 成本 | 零成本 | 需持有域名 |
| 命名自由度 | 被 GitHub 账号名绑死 | 完全自主,可用品牌名 |
| 长期稳定性 | 账号改名 / 弃用会受影响 | 域名在即命名在 |
| 多项目复用 | 共用一个账号命名空间 | 共用一个域名命名空间 |
| 适用场景 | 没有域名的快速起步 | 已有域名的品牌化项目 |
弊端说明:方案一虽然零成本,但命名会带上 GitHub 账号名(如
changluya),既不好看也无法改;一旦账号改名,历史坐标就"名不副实"。方案二需要你真正持有并会操作域名 DNS,但长期收益更大。
2.3 本方案的选择
本方案采用方案二:命名空间 cloud.changlu,项目子空间 cloud.changlu.agentforge。
因此下文的全部前置准备(命名空间校验用 DNS TXT、Token、GPG、settings)都按「自有域名」路径编写。
注意:如果你想改用方案一,只需把命名空间换成
io.github.changluya,并把"DNS TXT 校验"替换成"建 GitHub 公开仓库",其余步骤(GPG / Token / settings.xml / 工程改造 / 发布流程)完全一致。
三、整体方案设计
3.1 发布哪些模块
AgentForge 是一个多模块工程,并不是所有模块都需要对外发布。我们把库模块发布,示例模块排除:
| 模块 artifactId | packaging | 是否发布 | 说明 |
|---|---|---|---|
agentforge-ai-parent |
pom | 是 | 所有模块的 parent,必须发布 |
agentforge-ai-bom |
pom | 是 | BOM,建议发布 |
agentforge-model |
pom | 是 | model 子模块的聚合 / 父 POM |
agentforge-model-api |
jar | 是 | |
agentforge-model-core |
jar | 是 | |
agentforge-model-openai |
jar | 是 | |
agentforge-model-anthropic |
jar | 是 | |
agentforge-model-registry |
jar | 是 | |
agentforge-framework |
pom | 是 | framework 子模块的聚合 / 父 POM |
agentforge-agent-core |
jar | 是 | |
agentforge-aggregator(根) |
pom | 否 | 只是聚合器,用户不需要 |
agentforge-examples / agentforge-studio / -ui / -web |
pom/jar | 否 | 示例,不发布 |
3.2 发布链路
本地构建
  → 各模块生成 sources / javadoc jar
  → 各模块 GPG 签名(.asc)
  → central-publishing-maven-plugin 打包成 bundle
  → 上传到 Sonatype Central Portal 校验
  → Portal 发布 → 同步到 Maven Central
重点:Sonatype 的
central-publishing-maven-plugin会把整个 reactor 的构件打成一个 bundle 上传,因此我们只需在 parent 里配置一次,而示例模块用excludeArtifacts排除即可。
3.3 是否需要脚本?
建议配置脚本。 把"版本号校验 → 本地签名打包预演 → 正式 deploy"封装成一个 release.sh,可以避免每次手敲长命令、漏参数。脚本内容见第七节。
日常开发仍然用 mvn install / test,只有发布时才走脚本。
四、前置准备(账号 / 域名 / 密钥)
本节按「自有域名」路径说明。若用 GitHub 方式,见 2.2 的说明。
4.1 注册 Sonatype Central Portal
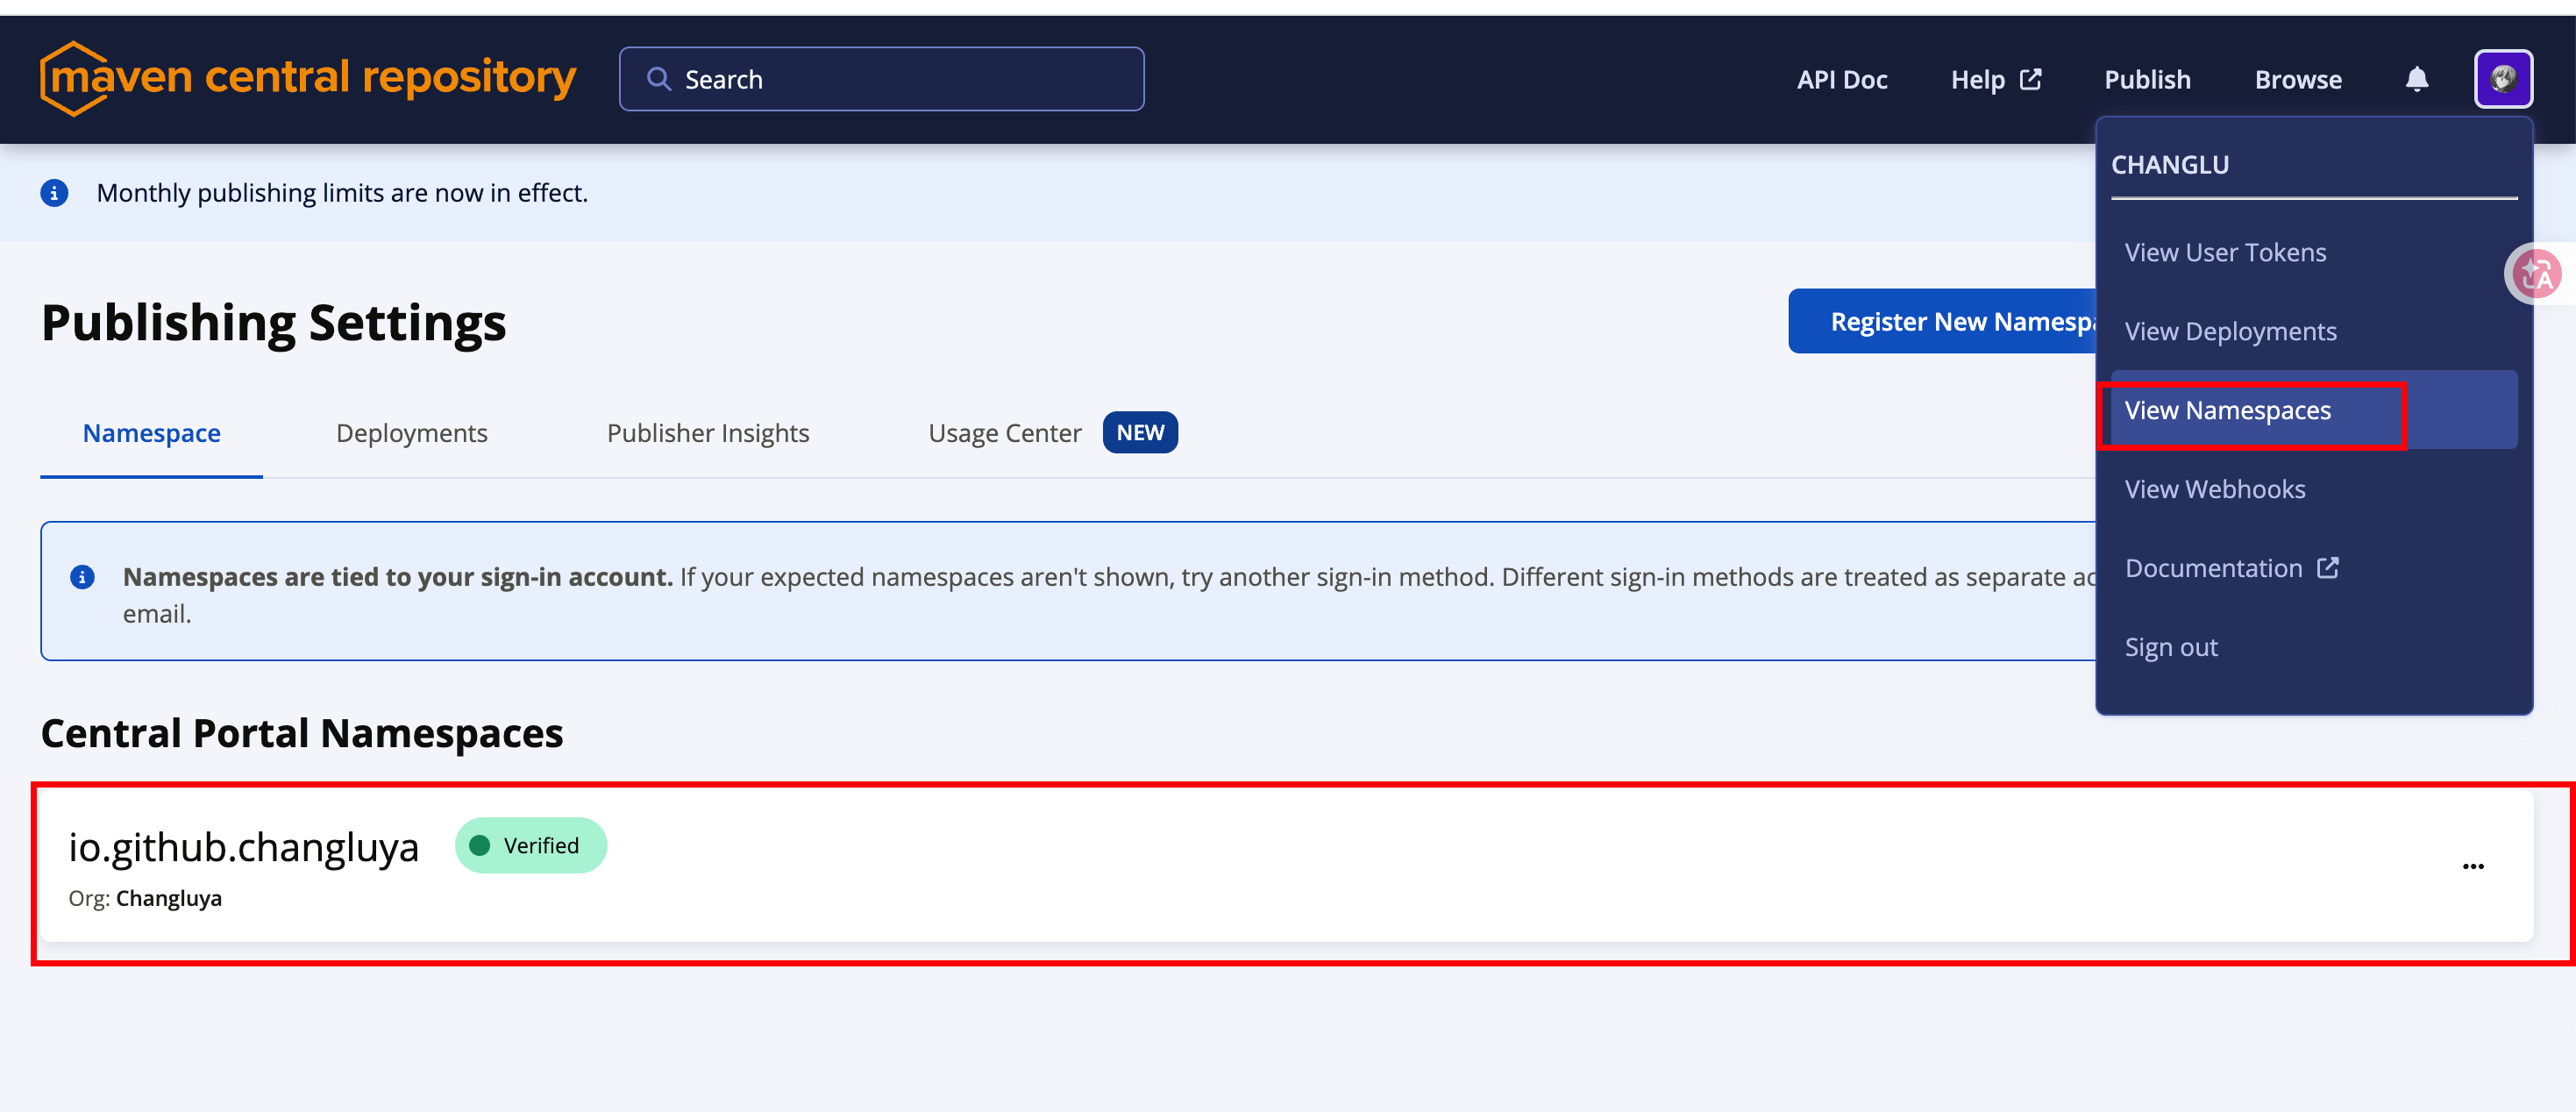
打开 https://central.sonatype.com/,用邮箱 / GitHub 注册登录,记住这个账号——后面命名空间、Token、发布都在这里管理。
默认进入的时候选择的namespace由于是github登陆的则是如下默认的namespace空间:
4.2 添加并校验命名空间 cloud.changlu(自有域名路径)
如何完成命名空间校验呢? 步骤如下:
- 登录 Portal → 右上角 Account → Namespaces(或首页 Add Namespace);
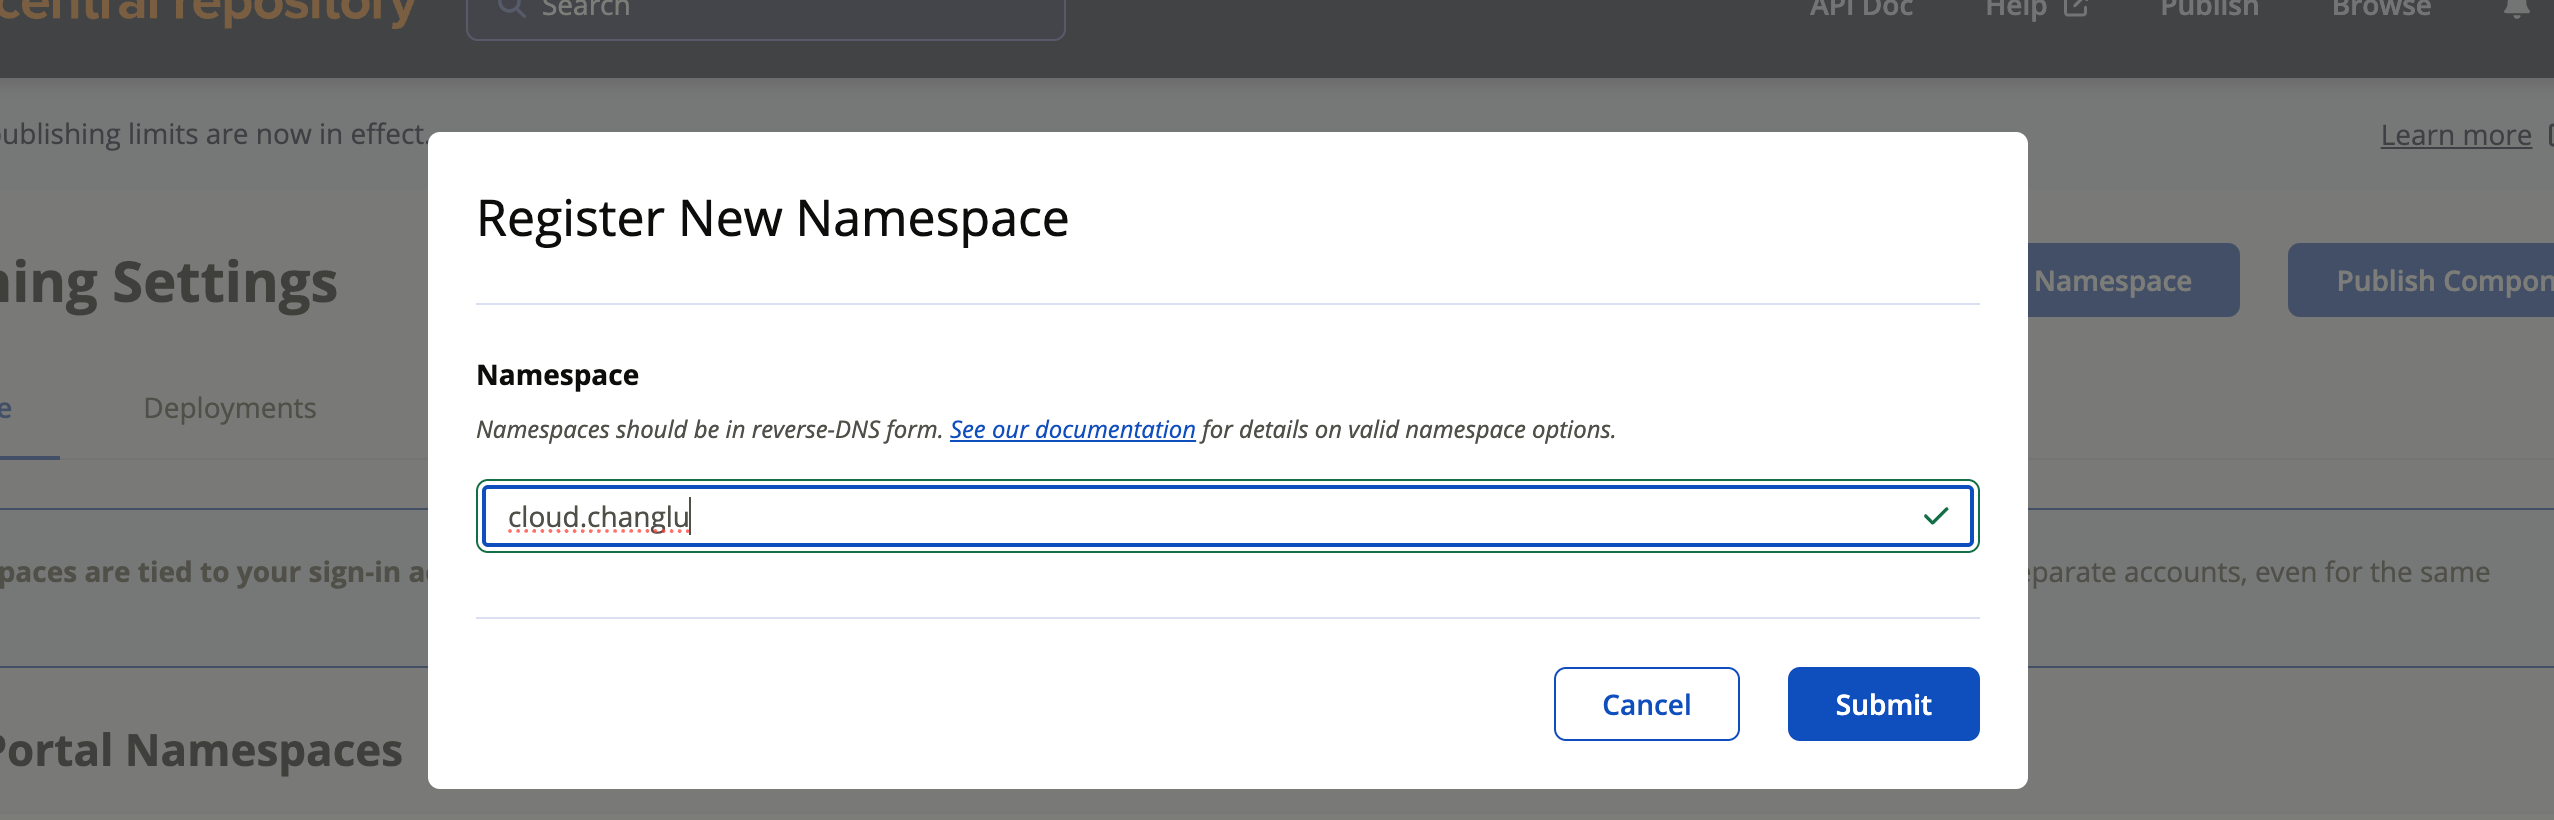
- 输入
cloud.changlu,提交;- 注意:校验针对的是域名本身
changlu.cloud,cloud.changlu只是它的反向命名空间;
- 注意:校验针对的是域名本身

-
Portal 给出一个 Verification Key,到
changlu.cloud的 DNS 服务商添加一条 TXT 记录:- 主机记录:
@(根域名changlu.cloud) - 记录类型:
TXT - 记录值:Portal 给出的验证值(完整粘贴)

- 主机记录:
-
如何验证 TXT 是否生效呢? 本地执行:
dig -t txt changlu.cloud
# 或
host -t txt changlu.cloud
能看到你添加的 TXT 值即可。
-
回到 Portal 点击 Verify,状态变为 Verified。
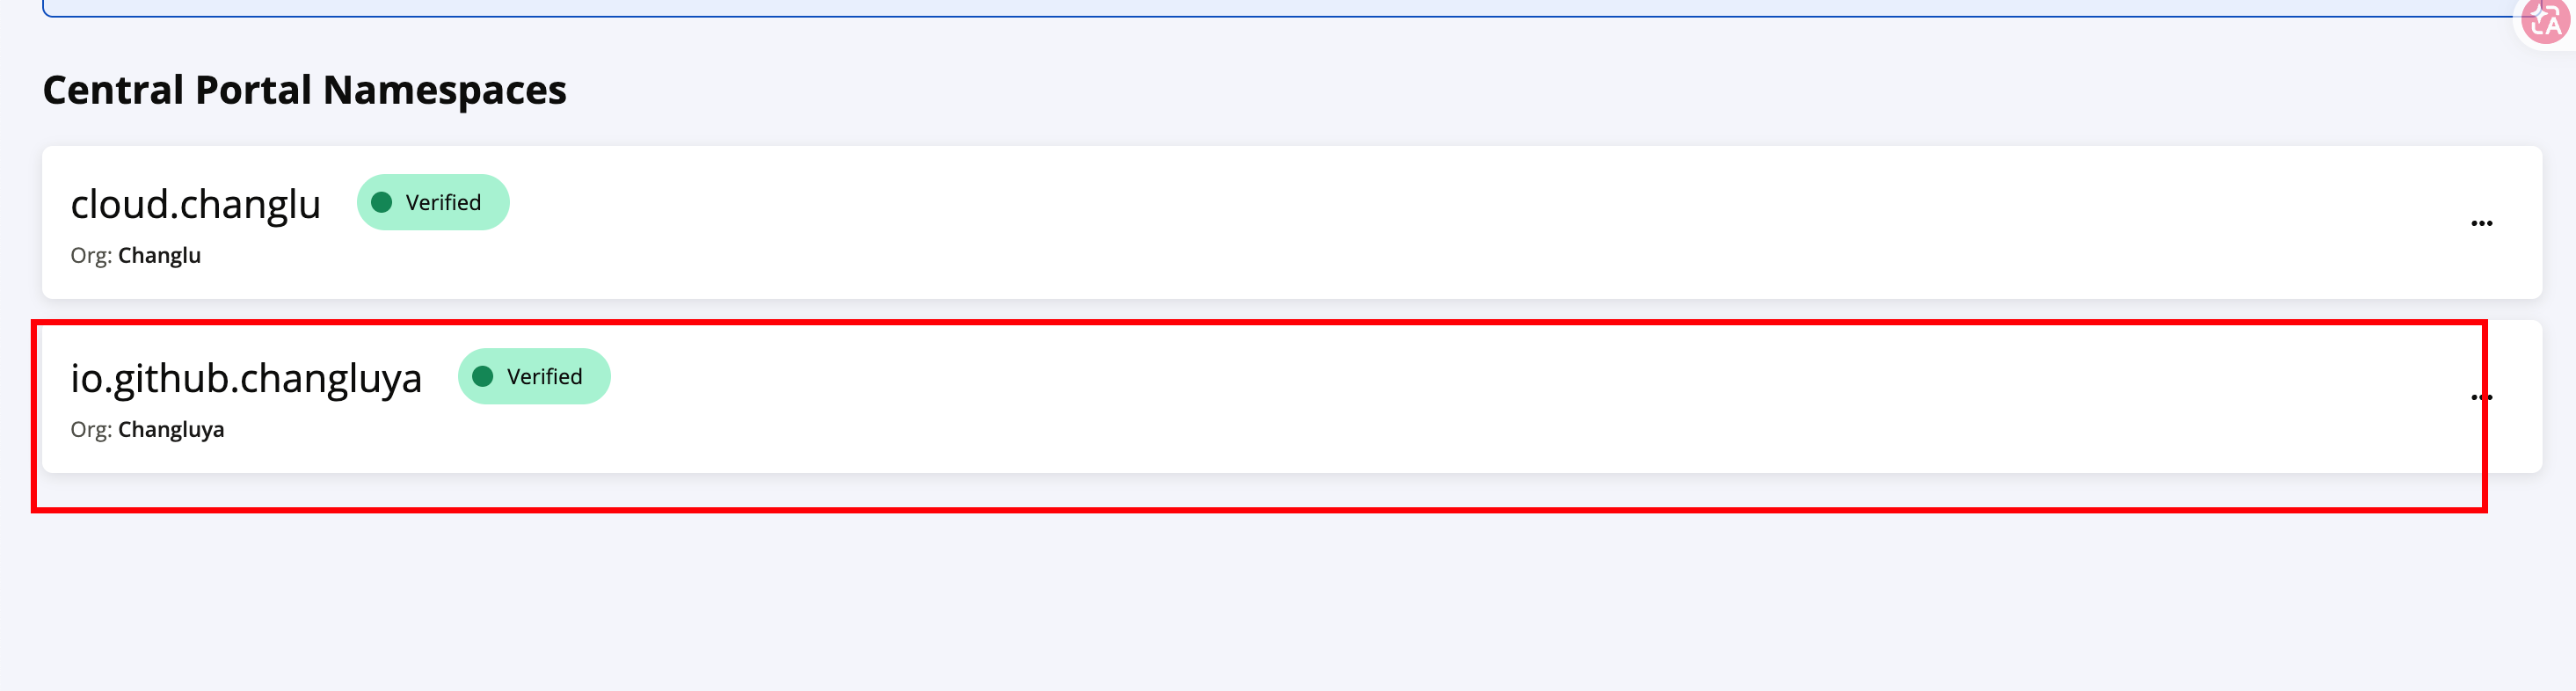
注意:DNS 有缓存,刚添加可能需要等几分钟到几十分钟;国内 DNS 商可能更久。
重点:命名空间一旦通过,其子命名空间(
cloud.changlu.agentforge)无需再次校验,可直接发布。
4.3 安装 GPG、生成密钥并上传公钥(含常见失败排查)
本节按“安装 → 配置 → 生成 → 签名自检 → 上传反查 → 备份”编排。除密钥向导中的姓名、公开邮箱和 Passphrase 需要人工输入外,命令块都可按顺序直接复制执行。示例不包含任何真实密钥、口令或 Token。
第 0 步:先确认本机是否已有 GPG:
gpg --version
- 有输出且 >= 2.2 → 直接跳到 4.3.2;
- 提示
command not found→ 按下文安装。
4.3.1 按操作系统选择安装方式
| 环境 | 推荐路径 | 适用说明 |
|---|---|---|
| macOS(Homebrew 当前支持版本) | Homebrew bottle | 最短路径,有预编译包时无需本地编译 |
| macOS 旧版本 / Homebrew Tier 3 | MacPorts | 优先使用对应 macOS 的二进制包 |
| macOS(偏好图形化) | GPG Suite | 自带 MacGPG、GPG Keychain 和 pinentry |
| Debian / Ubuntu / WSL | apt |
使用发行版软件包 |
| Fedora / RHEL | dnf |
使用发行版软件包 |
| Windows 10/11 | Gpg4win | 官方推荐的 Windows 安装包,自带 Kleopatra/pinentry |
macOS
先看 macOS 版本,再选安装路径:
sw_vers -productVersion
uname -m
Homebrew 只会为当前支持的 macOS 版本持续生成预编译 bottle。较旧的 macOS 可能被划为 Tier 3,此时 brew install gnupg 会转为从源码编译 OpenSSL 等大型依赖,耗时且容易中断。以 2026-10 的官方支持矩阵为例,Apple Silicon 上 macOS 15–27 可用 bottle,macOS 11–14 属 Tier 3。请以 Homebrew Support Tiers 的实时说明为准。
路径 A:Homebrew(当前受支持的 macOS)
brew --version
brew install gnupg pinentry-mac
command -v gpg
gpg --version
Homebrew 在有匹配 bottle 时会自动下载预编译包,无需手动加 --force-bottle。如果提示 has no bottle 或长时间出现 build.rb / 编译 openssl@3,说明当前系统没有匹配的二进制包;不要反复启动 brew install,直接改用路径 B 或 C。
Apple Silicon 上 Homebrew 默认在
/opt/homebrew;若command -v gpg无输出,执行eval "$(/opt/homebrew/bin/brew shellenv)",并将该行写入~/.zprofile。Intel Mac 默认前缀为/usr/local。
路径 B:MacPorts(旧版 macOS 推荐,可用二进制包)
- 从 MacPorts 官方安装页 下载与 macOS 大版本一致的
.pkg(例如 Sonoma 14)并安装; - 打开新终端,执行:
cd /tmp
sudo /opt/local/bin/port selfupdate
# 使用默认 +pinentry(终端口令输入器),不需要完整 Xcode
sudo /opt/local/bin/port install gnupg2

export PATH="/opt/local/bin:/opt/local/sbin:$PATH"
command -v gpg && gpg --version
MacPorts 默认安装到 /opt/local。若 PATH 未自动生效:
echo 'export PATH="/opt/local/bin:/opt/local/sbin:$PATH"' >> ~/.zprofile
source ~/.zprofile
不要在只安装了 Command Line Tools 的机器上加
+pinentry_mac。MacPorts 的pinentry-mac端口要求完整 Xcode,否则会报requires a full Xcode installation。Maven Central 签名使用默认终端版pinentry即可。如果已用错误 variant 启动过构建,需先清理该 port 的临时构建目录,再安装默认 variant:
cd /tmp
sudo /opt/local/bin/port clean gnupg2
sudo /opt/local/bin/port install gnupg2
port clean gnupg2只会清理该 port 的临时构建产物,不会删除项目文件,也不会卸载已安装的其他依赖。
路径 C:GPG Suite(图形化快速方案)
从 GPG Suite 官网 下载与当前 macOS 兼容的安装包。它自带 MacGPG、GPG Keychain 和 pinentry,不需要用 Homebrew 编译 OpenSSL。GPG Mail 是可选邮件插件,发布 Maven Central 并不需要它。
/usr/local/MacGPG2/bin/gpg --version
echo 'export PATH="/usr/local/MacGPG2/bin:$PATH"' >> ~/.zprofile
source ~/.zprofile
Linux / WSL
GnuPG 通常已在 Linux 发行版中提供。WSL 按其 Linux 发行版执行相同命令:
# Debian / Ubuntu / WSL Ubuntu
sudo apt update
sudo apt install -y gnupg2 pinentry-curses

# Fedora / RHEL
sudo dnf install -y gnupg2 pinentry

gpg --version
SSH、CI 或纯终端环境建议使用 pinentry-curses,并在当前 shell 设置:
export GPG_TTY="$(tty)"
Windows 10/11
从 Gpg4win 官网 下载安装包。发布 Maven Central 只需 GnuPG 和 pinentry,Kleopatra 可用于图形化管理密钥。安装后重开 PowerShell 验证:
gpg --version
where.exe gpg
gpg 若未进入 PATH,将 Gpg4win 的 bin 目录加入用户 PATH,再重开 PowerShell。
什么时候才需要 Command Line Tools
Homebrew 安装 gnupg 时若报下面这个错:
Error: No developer tools installed.
Install the Command Line Tools:
  xcode-select --install
说明系统缺少 Command Line Tools——即使 /usr/bin/clang 存在,只要没有"active developer directory"就会报。先执行:
xcode-select --install
会弹出安装窗口,点 安装 / Install,等待下载安装完成(几分钟)。完成后确认:
xcode-select -p
# 期望输出:/Library/Developer/CommandLineTools
注意:安装 bottle 时 Apple Silicon 通常不需要 CLT;从源码编译时才必须安装。若已装完整 Xcode,也可用
sudo xcode-select --switch /Applications/Xcode.app/Contents/Developer。
4.3.2 验证 PATH 并配置 pinentry
先确认 Maven 后续能通过 PATH 找到同一个 gpg:
command -v gpg
gpg --version
command -v pinentry || true
command -v gpg 必须输出一个真实路径,然后再执行下面的对应环境命令。
macOS/Linux 建议把 GPG_TTY 写入 shell 配置,避免口令提示绑定到错误终端:
# zsh(macOS 默认)
grep -qxF 'export GPG_TTY="$(tty)"' ~/.zshrc 2>/dev/null || \
  echo 'export GPG_TTY="$(tty)"' >> ~/.zshrc
export GPG_TTY="$(tty)"
bash 用户执行:
grep -qxF 'export GPG_TTY="$(tty)"' ~/.bashrc 2>/dev/null || \
  echo 'export GPG_TTY="$(tty)"' >> ~/.bashrc
export GPG_TTY="$(tty)"
macOS 上 gpg --full-generate-key 最常见的报错就是 No pinentry 或 Inappropriate ioctl for device,原因是找不到口令输入程序:
Homebrew 用户直接复制:
mkdir -p ~/.gnupg
chmod 700 ~/.gnupg
PINENTRY="$(brew --prefix)/bin/pinentry-mac"
touch ~/.gnupg/gpg-agent.conf
sed -i.bak '/^pinentry-program /d' ~/.gnupg/gpg-agent.conf
echo "pinentry-program $PINENTRY" >> ~/.gnupg/gpg-agent.conf
chmod 600 ~/.gnupg/gpg-agent.conf
gpgconf --kill gpg-agent
MacPorts 用户直接复制:
export PATH="/opt/local/bin:/opt/local/sbin:$PATH"
mkdir -p ~/.gnupg
chmod 700 ~/.gnupg
touch ~/.gnupg/gpg-agent.conf
sed -i.bak '/^pinentry-program /d' ~/.gnupg/gpg-agent.conf
echo 'pinentry-program /opt/local/bin/pinentry' >> ~/.gnupg/gpg-agent.conf
chmod 600 ~/.gnupg/gpg-agent.conf
gpgconf --kill gpg-agent
Linux 纯终端用户若需要显式配置 pinentry-curses:
mkdir -p ~/.gnupg
chmod 700 ~/.gnupg
touch ~/.gnupg/gpg-agent.conf
sed -i.bak '/^pinentry-program /d' ~/.gnupg/gpg-agent.conf
echo "pinentry-program $(command -v pinentry-curses)" >> ~/.gnupg/gpg-agent.conf
chmod 600 ~/.gnupg/gpg-agent.conf
gpgconf --kill gpg-agent
GPG Suite 和 Gpg4win 已自带并配置 pinentry,通常无需手动写 gpg-agent.conf。MacPorts 默认的 /opt/local/bin/pinentry 是终端版,可直接用于 Maven 签名。
4.3.3 生成密钥对
个人本机推荐交互式,让 pinentry 安全读取 Passphrase,避免把口令写入 shell 历史或配置文件:
export GPG_TTY="$(tty)" 2>/dev/null || true
gpg --full-generate-key
# RSA and RSA → 4096 → 有效期(例如 2y)→ 姓名/邮箱 → 设置强 Passphrase
建议值:
- 类型:
RSA and RSA; - 长度:
4096; - 有效期:建议
2y,到期前可续期,比永久密钥更易管理风险; - 姓名/邮箱:使用长期维护 Maven Central 构件的发布者身份;
- Passphrase:使用强口令,不要写入仓库、脚本或 shell 历史。
CI 场景可用
--batch生成专用密钥,但不建议把%no-protection作为个人发布密钥的默认选项。如果必须使用无口令 CI 密钥,应限定用途、设置有效期,并将私钥仅保存在 CI Secret 中。
4.3.4 查看并记录 KEY_ID
gpg --list-secret-keys --keyid-format=long
# sec   rsa4096/ABCDEF1234567890 2026-10-04 ...
#              ^^^^^^^^^^^^^^^^ 即 KEY_ID
同时记录完整的 40 位指纹,对外核对密钥时应优先使用指纹,不要只比较短 KEY_ID:
# 自动取当前密钥环中的第一把私钥
KEY_ID="$(gpg --batch --with-colons --list-secret-keys | awk -F: '$1 == "sec" { print $5; exit }')"
FULL_FINGERPRINT="$(gpg --batch --with-colons --fingerprint "$KEY_ID" | awk -F: '$1 == "fpr" { print $10; exit }')"

test -n "$KEY_ID" && test -n "$FULL_FINGERPRINT" || {
  echo 'ERROR: 未找到私钥或指纹'
  exit 1
}
echo "KEY_ID=$KEY_ID"
echo "FULL_FINGERPRINT=$FULL_FINGERPRINT"
gpg --fingerprint "$KEY_ID"
如果密钥环中已有多把私钥,先通过
gpg --list-secret-keys --keyid-format=long找到本次创建的密钥,再手动执行KEY_ID="16位长KEY_ID"。后续命令默认在同一个终端中执行并复用这两个变量。
4.3.5 本地签名与验签(发布前必做)
这一步会同时验证私钥、pinentry、Passphrase 和 GPG agent,比直接跑 Maven 更容易定位问题:
# 即使换了新终端,也能自动恢复变量
KEY_ID="${KEY_ID:-$(gpg --batch --with-colons --list-secret-keys | awk -F: '$1 == "sec" { print $5; exit }')}"

echo 'AgentForge Maven Central GPG signing test' > /tmp/agentforge-gpg-test.txt

gpg --local-user "$KEY_ID" \
  --armor \
  --detach-sign /tmp/agentforge-gpg-test.txt

gpg --verify \
  /tmp/agentforge-gpg-test.txt.asc \
  /tmp/agentforge-gpg-test.txt
看到 Good signature / 完好的签名 即表示本地签名链路正常。测试文件位于 /tmp,不要将其提交到项目。
4.3.6 上传公钥并从服务器反查
# 自动恢复 KEY_ID 与完整指纹
KEY_ID="${KEY_ID:-$(gpg --batch --with-colons --list-secret-keys | awk -F: '$1 == "sec" { print $5; exit }')}"
FULL_FINGERPRINT="${FULL_FINGERPRINT:-$(gpg --batch --with-colons --fingerprint "$KEY_ID" | awk -F: '$1 == "fpr" { print $10; exit }')}"

# 主用:Ubuntu 服务器(较稳定)
gpg --keyserver hkps://keyserver.ubuntu.com --send-keys "$KEY_ID"

# 备用:主用超时时改用它
gpg --keyserver hkps://keys.openpgp.org --send-keys "$KEY_ID"

# 上传后请使用完整指纹反查,不要只用短 KEY_ID
curl -fsSL \
  "https://keyserver.ubuntu.com/pks/lookup?op=get&search=0x${FULL_FINGERPRINT}" \
  | grep 'BEGIN PGP PUBLIC KEY BLOCK'
输出 BEGIN PGP PUBLIC KEY BLOCK 说明 keyserver 已经可以返回该公钥。刚上传后索引可能有短暂延迟,等待几十秒后再查即可。
注意:
keys.openpgp.org会剥离用户身份,且需要收邮件点确认链接后才算上传成功;Maven Central 更常从keyserver.ubuntu.com拉取,因此优先用 ubuntu。
4.3.7 备份私钥和 ownertrust
公钥可以公开,私钥必须加密保存。备份时先限制当前 shell 的文件权限:
umask 077
KEY_ID="${KEY_ID:-$(gpg --batch --with-colons --list-secret-keys | awk -F: '$1 == "sec" { print $5; exit }')}"
GPG_BACKUP_DIR="$HOME/agentforge-gpg-backup"
mkdir -p "$GPG_BACKUP_DIR"
chmod 700 "$GPG_BACKUP_DIR"

gpg --armor --export-secret-keys "$KEY_ID" \
  > "$GPG_BACKUP_DIR/agentforge-private-key.asc"
gpg --export-ownertrust \
  > "$GPG_BACKUP_DIR/agentforge-ownertrust.txt"
chmod 600 "$GPG_BACKUP_DIR"/*
$HOME/agentforge-gpg-backup 只是临时导出位置。加密磁盘、离线介质或支持安全附件的密码管理器才是合适的长期备份位置。转移完成后删除该临时目录;不要提交 Git,不要上传网盘明文,不要把私钥或 Passphrase 发给他人。
4.3.8 完整验收清单
command -v gpg
gpg --version
gpg --list-secret-keys --keyid-format=long
KEY_ID="${KEY_ID:-$(gpg --batch --with-colons --list-secret-keys | awk -F: '$1 == "sec" { print $5; exit }')}"
gpg --fingerprint "$KEY_ID"
gpg --verify /tmp/agentforge-gpg-test.txt.asc /tmp/agentforge-gpg-test.txt
全部满足以下条件后,4.3 才算完成:
gpg可通过 PATH 找到;- 能看到私钥、长 KEY_ID 和完整指纹;
- detached signature 本地验签成功;
- Ubuntu keyserver 能按完整指纹返回公钥;
- 私钥和 ownertrust 已在仓库外安全备份;
- KEY_ID 已记录,供 Maven GPG 插件使用。
4.3.9 常见失败与排查
| 现象 | 原因 | 处理 |
|---|---|---|
gpg: command not found |
未安装 / 安装目录不在 PATH | 按 4.3.1 选择本机路径,并配置 /opt/homebrew/bin、/opt/local/bin 或 Gpg4win bin |
No pinentry / Inappropriate ioctl for device |
缺 pinentry / GPG_TTY 未设置 / 配置了错误路径 |
按 4.3.2 检查 pinentry,设置 export GPG_TTY="$(tty)",然后 gpgconf --kill gpg-agent |
brew: command not found |
未装 Homebrew | 按 4.3.1 方式一安装 |
Error: No developer tools installed |
缺 Xcode Command Line Tools | 执行 xcode-select --install,或改用 4.3.1 方式二 GPG Suite |
Homebrew 长时间编译 openssl@3 |
当前 macOS 无匹配 bottle / Tier 3 | 停止重复安装,改用 MacPorts 的对应 macOS .pkg 和 gnupg2 |
--force-bottle 仍报 has no bottle |
当前公式未发布该系统的 bottle | 参数无法凭空生成 bottle,改用 MacPorts / GPG Suite |
MacPorts 报 pinentry-mac requires a full Xcode installation |
显式选了 +pinentry_mac |
无需安装完整 Xcode;运行 sudo port clean gnupg2 && sudo port install gnupg2 改用默认 +pinentry |
MacPorts 报 Requested variants ... do not match |
上一次失败构建留下了 variant 缓存 | 运行 sudo port clean gnupg2,然后重新安装 |
| 生成密钥时卡住无反应 | pinentry 弹窗被拦截 / TTY 不正确 | 确保终端在前台,执行 export GPG_TTY="$(tty)" 和 gpgconf --kill gpg-agent 后重试 |
signing failed: No pinentry |
Maven 进程启动时找不到 pinentry | 用 4.3.5 的独立签名测试先验证,并检查 gpg-agent.conf 中的绝对路径 |
keyserver send failed: Connection timed out |
公钥服务器网络问题 | 换 hkps://keys.openpgp.org 重试 |
发送命令长时间停在 sending key |
keyserver 回应慢,不一定表示失败 | 先用 4.3.6 的 HTTPS 指纹查询反查,查得到公钥即已上传 |
| openpgp.org 上传后查不到 | 需邮箱确认 | 邮箱点确认后重新 --send-keys |
签名时报 No secret key |
KEY_ID 不对 / 密钥在别的 keyring | gpg --list-secret-keys 核对,或加 --local-user "$KEY_ID" |
注意:私钥与 Passphrase 只在本机 / CI 使用,不要提交到仓库。公开的只有公钥、KEY_ID 和指纹。
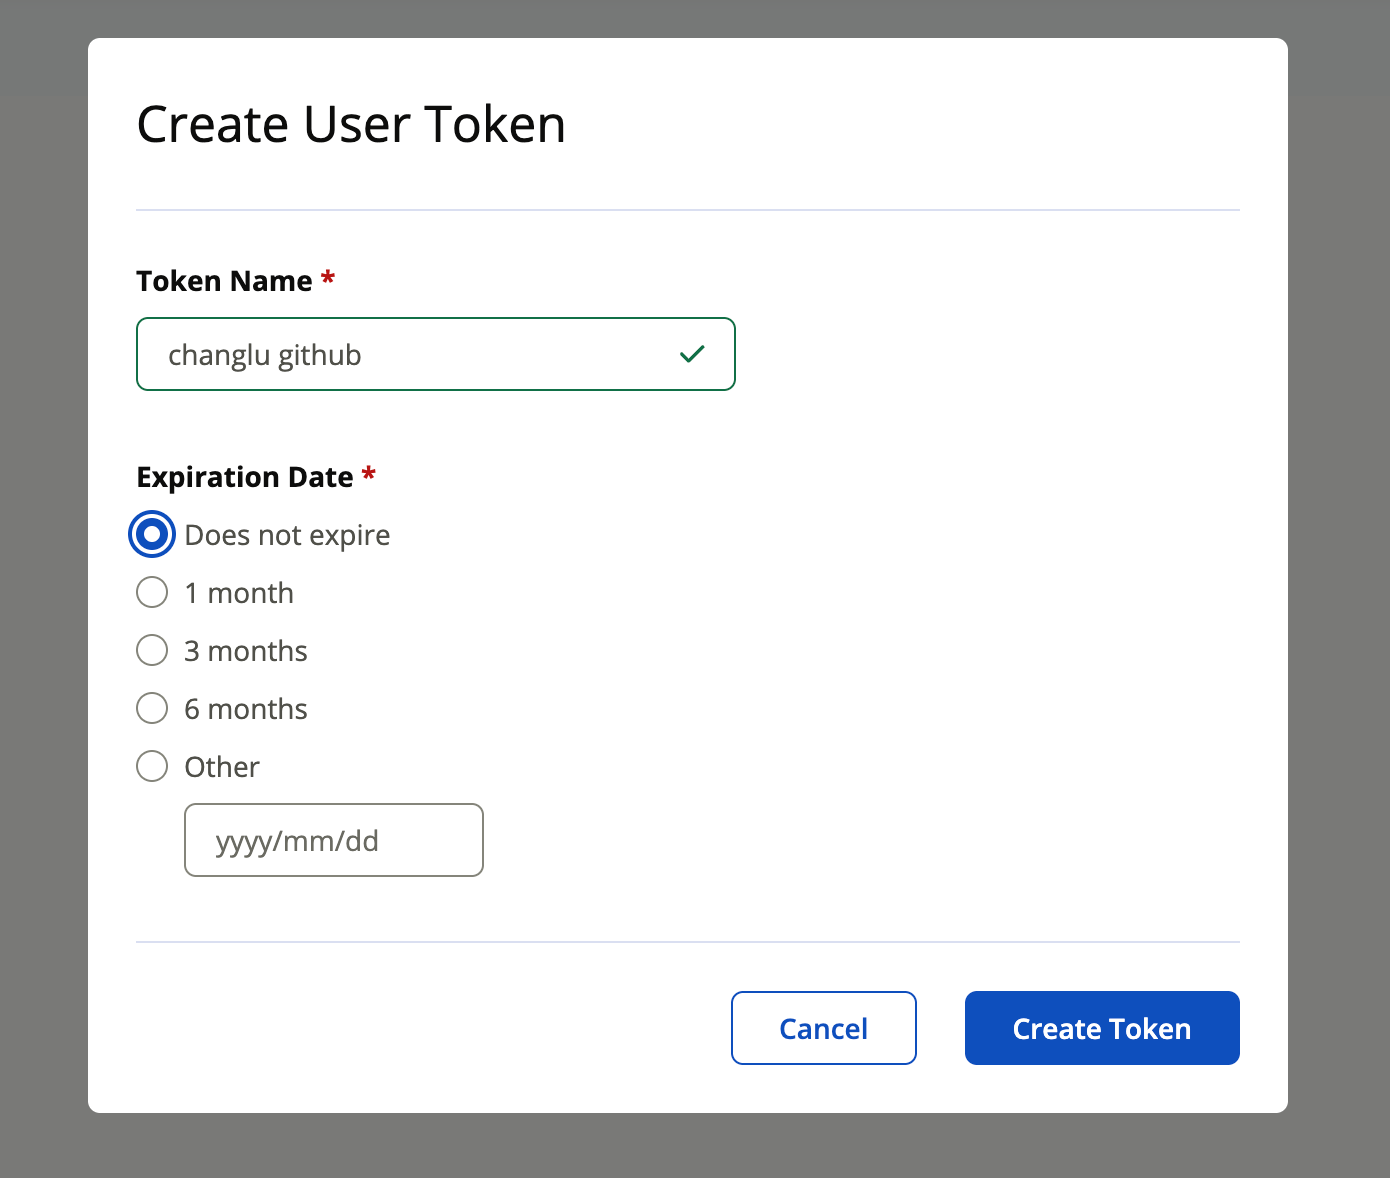
4.4 生成 Portal User Token
-
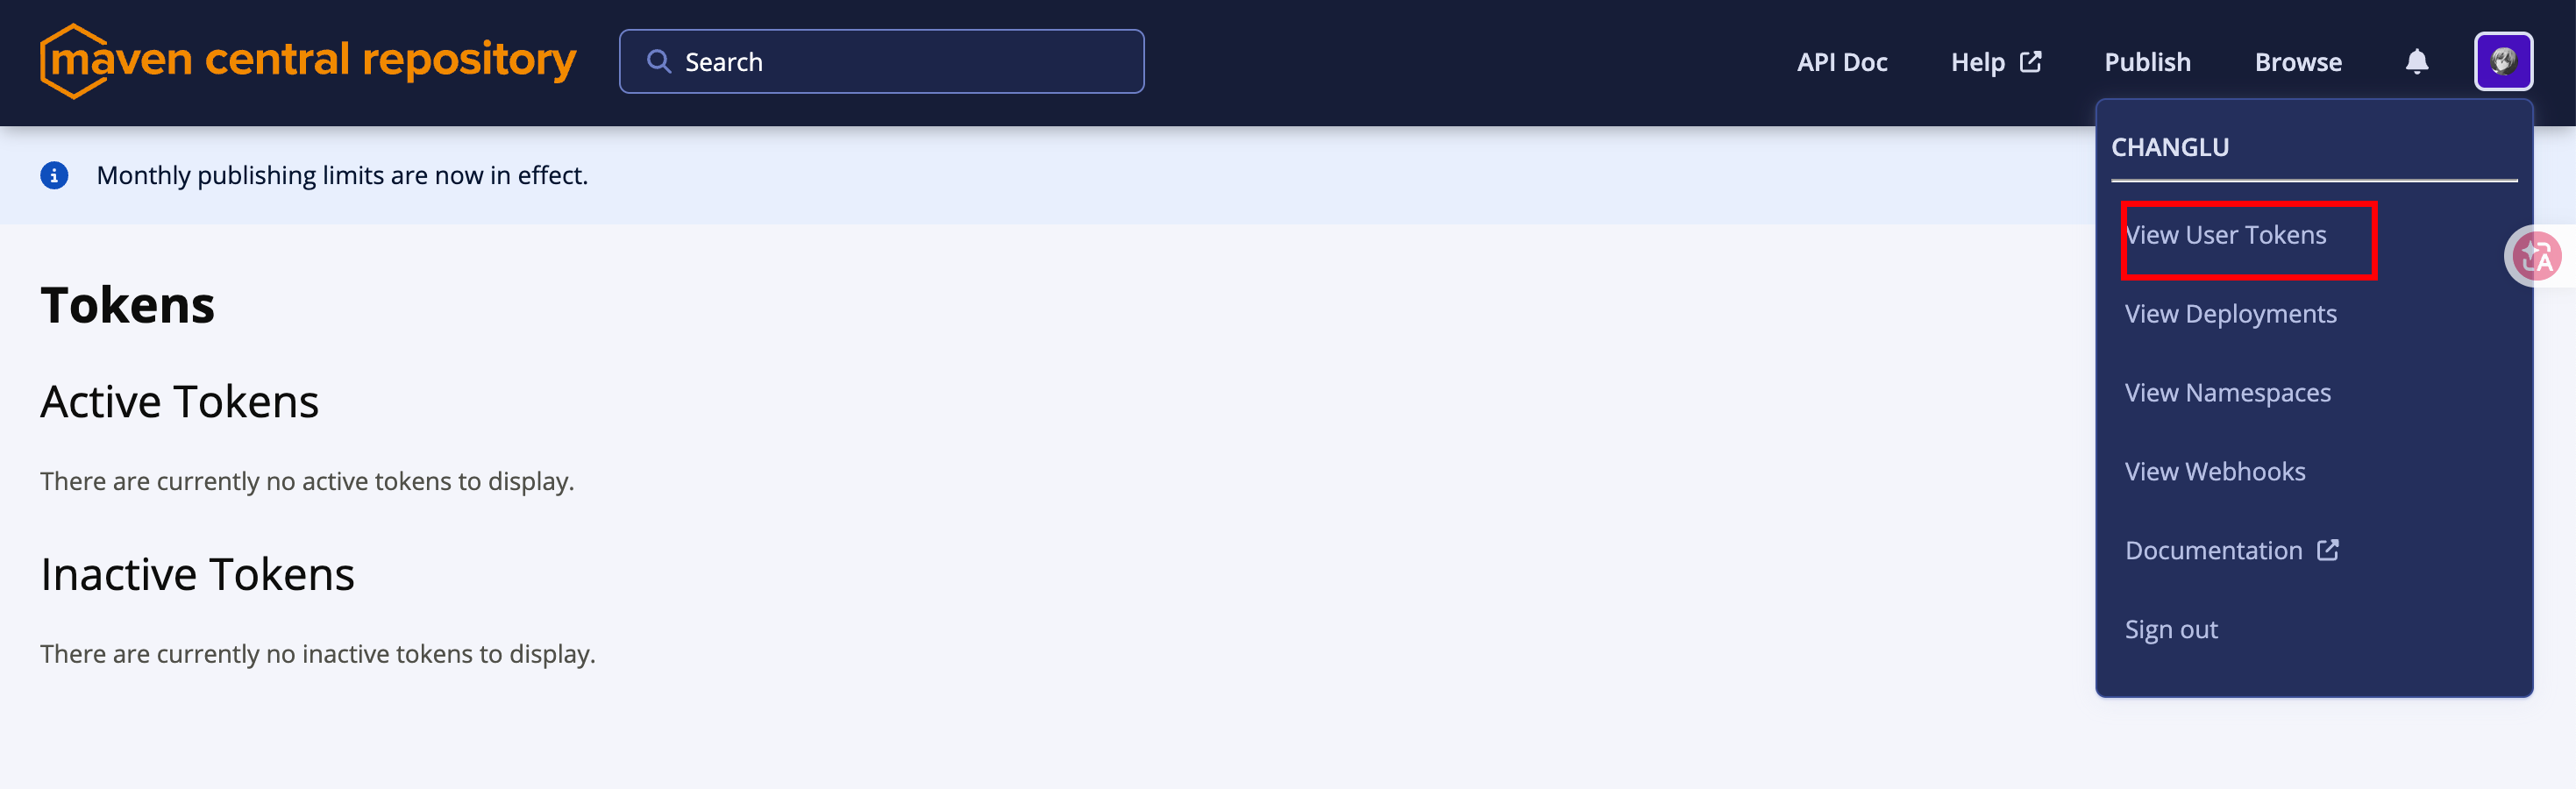
右上角打开用户菜单,点击 View User Tokens(或访问 https://central.sonatype.com/account);
-
在 User Tokens 页面生成 Token,得到一对 username / password(这是 Token,不是登录密码),只显示一次,立即保存。
4.5 配置 Maven settings.xml
可以使用 Maven 默认位置 ~/.m2/settings.xml,也可放在仓库外的独立目录,发布时通过 mvn -s /absolute/path/settings.xml 指定。下面配置不把 GPG Passphrase 明文写入 XML:
<?xml version="1.0" encoding="UTF-8"?>
<settings xmlns="http://maven.apache.org/SETTINGS/1.0.0"
          xmlns:xsi="http://www.w3.org/2001/XMLSchema-instance"
          xsi:schemaLocation="http://maven.apache.org/SETTINGS/1.0.0
                              https://maven.apache.org/xsd/settings-1.0.0.xsd">
    <servers>
        <!-- Central Portal 的 User Token -->
        <server>
            <id>central</id>
            <username>YOUR_CENTRAL_TOKEN_USERNAME</username>
            <password>YOUR_CENTRAL_TOKEN_PASSWORD</password>
        </server>

    </servers>
</settings>
限制文件权限:
chmod 600 /absolute/path/settings.xml
发布前在当前终端安全读取 GPG Passphrase,输入时不回显,也不进入 shell 历史:
printf 'GPG Passphrase: '
IFS= read -r -s MAVEN_GPG_PASSPHRASE
printf '\n'
export MAVEN_GPG_PASSPHRASE
使用自定义配置文件时,Maven 命令必须带 -s:
mvn -s /absolute/path/settings.xml help:effective-settings
重点:
<server id="central">对应发布插件的publishingServerId,不要写成${server}。Maven GPG Plugin 3.2.x 默认从MAVEN_GPG_PASSPHRASE读取口令,不再需要在settings.xml增加gpgserver。
settings.xml包含 Central Token,不得提交到 Git。文章中只使用占位符,不展示真实 Token 或 Passphrase。
五、工程构建改造(POM)
为什么核心发布配置只改两个文件? 因为本仓库模块的 parent 是 agentforge-ai-parent,根 agentforge-aggregator 并不是模块的 parent,所以:
- 所有模块要用的插件(source/javadoc/gpg/central)→ 放
agentforge-ai-parent; - 根聚合器自己不发布 → 根 POM 加
maven.deploy.skip=true。
Central 还要求每个发布 POM 具有完整描述;如果某个子聚合模块原来缺少 <description>,还需在该模块的 POM 中补上。本项目对应为 agentforge-model/pom.xml 和 agentforge-framework/pom.xml。
改造全部放进 release profile,日常 mvn install / test 不触发,行为不变。
5.1 根 pom.xml
在 <properties> 增加(只影响根聚合器自身):
<properties>
    <revision>1.0.0-SNAPSHOT</revision>
    <!-- 根聚合器不发布到 Central -->
    <maven.deploy.skip>true</maven.deploy.skip>
    ...
</properties>
5.2 agentforge-ai-parent/pom.xml 补齐元数据
在 <licenses>...</licenses> 之后增加:
<developers>
    <developer>
        <id>changlu</id>
        <name>changlu</name>
        <email>YOUR_PUBLIC_EMAIL_OR_NOREPLY_EMAIL</email>
        <url>https://changlu.cloud</url>
        <organization>AgentForge</organization>
        <organizationUrl>https://github.com/changluya/AgentForge</organizationUrl>
    </developer>
</developers>

<scm>
    <connection>scm:git:https://github.com/changluya/AgentForge.git</connection>
    <developerConnection>scm:git:ssh://git@github.com/changluya/AgentForge.git</developerConnection>
    <tag>HEAD</tag>
    <url>https://github.com/changluya/AgentForge</url>
</scm>
licenses/developers/scm会被子模块继承,Central 校验时可读取;name/description现有模块已具备,如校验提示缺url,在 parent 补<url>或逐模块补齐。
5.3 agentforge-ai-parent/pom.xml 增加 release profile
先在现有 <properties> 中统一声明插件版本:
<gpg.executable>gpg</gpg.executable>
<!-- 公开指纹:固定发布密钥,避免多私钥环境误签 -->
<gpg.keyname>YOUR_FULL_GPG_FINGERPRINT</gpg.keyname>
<maven.gpg.plugin.version>3.2.8</maven.gpg.plugin.version>
<maven.javadoc.plugin.version>3.11.2</maven.javadoc.plugin.version>
<maven.source.plugin.version>3.3.1</maven.source.plugin.version>
<central.publishing.maven.plugin.version>0.11.0</central.publishing.maven.plugin.version>
再在 </project> 之前加入:
<profiles>
    <profile>
        <id>release</id>
        <build>
            <plugins>
                <!-- 1) 为每个待发布 JAR 附加 Central 必需的 sources JAR -->
                <plugin>
                    <groupId>org.apache.maven.plugins</groupId>
                    <artifactId>maven-source-plugin</artifactId>
                    <version>${maven.source.plugin.version}</version>
                    <executions>
                        <execution>
                            <id>attach-sources</id>
                            <goals><goal>jar-no-fork</goal></goals>
                        </execution>
                    </executions>
                </plugin>

                <!-- 2) 附加 Central 必需的 Javadoc JAR;放宽 doclint,避免文档告警阻断发布 -->
                <plugin>
                    <groupId>org.apache.maven.plugins</groupId>
                    <artifactId>maven-javadoc-plugin</artifactId>
                    <version>${maven.javadoc.plugin.version}</version>
                    <configuration>
                        <doclint>none</doclint>
                        <quiet>true</quiet>
                    </configuration>
                    <executions>
                        <execution>
                            <id>attach-javadocs</id>
                            <goals><goal>jar</goal></goals>
                        </execution>
                    </executions>
                </plugin>

                <!-- 3) verify 阶段签名 POM 及全部附件;口令来自 gpg-agent 或 MAVEN_GPG_PASSPHRASE -->
                <plugin>
                    <groupId>org.apache.maven.plugins</groupId>
                    <artifactId>maven-gpg-plugin</artifactId>
                    <version>${maven.gpg.plugin.version}</version>
                    <configuration>
                        <!-- 脚本会用 -Dgpg.executable 覆盖为 MacPorts / Homebrew 绝对路径 -->
                        <executable>${gpg.executable}</executable>
                        <keyname>${gpg.keyname}</keyname>
                        <bestPractices>true</bestPractices>
                    </configuration>
                    <executions>
                        <execution>
                            <id>sign-artifacts</id>
                            <goals><goal>sign</goal></goals>
                            <phase>verify</phase>
                        </execution>
                    </executions>
                </plugin>

                <!-- 4) 将 reactor 构件汇总为一个 Central Portal deployment;首发保留手动 Publish -->
                <plugin>
                    <groupId>org.sonatype.central</groupId>
                    <artifactId>central-publishing-maven-plugin</artifactId>
                    <version>${central.publishing.maven.plugin.version}</version>
                    <extensions>true</extensions>
                    <configuration>
                        <publishingServerId>central</publishingServerId>
                        <!-- 首次建议 false:上传后到 Portal 手工检查再发布 -->
                        <autoPublish>false</autoPublish>
                        <!-- 排除示例模块,避免被打进上传 bundle -->
                        <excludeArtifacts>
                            <excludeArtifact>agentforge-examples</excludeArtifact>
                            <excludeArtifact>agentforge-studio</excludeArtifact>
                            <excludeArtifact>agentforge-studio-ui</excludeArtifact>
                            <excludeArtifact>agentforge-studio-web</excludeArtifact>
                        </excludeArtifacts>
                    </configuration>
                </plugin>
            </plugins>
        </build>
    </profile>
</profiles>
重点:
extensions=true让插件接管 deploy,并把整个 reactor 打成一个 bundle 上传;excludeArtifacts按 artifactId 排除,确保 Studio 示例不进入 bundle;bestPractices=true禁止在 POM / XML 中传入明文 GPG 口令,发布前使用MAVEN_GPG_PASSPHRASE;autoPublish=false(首次)上传后需到 Portal 手动点 Publish,稳定后可改true并加<waitUntil>published</waitUntil>。
5.4 版本号策略
-
工程用
${revision}管理版本,flatten-maven-plugin已配置resolveCiFriendliesOnly,部署前会把${revision}解析为实际版本; -
发布时不改文件,命令行覆盖即可:
-Drevision=1.0.0
弊端说明:正式版本不能是
1.0.0-SNAPSHOT;且 Central 版本一经发布不可覆盖,每次发布请递增版本号。
5.5 本地验证第五步(不签名、不上传)
在仓库根目录执行。这里只选中实际要发布的 10 个模块,避免 Studio 示例工程下载大量无关依赖:
SETTINGS_FILE="/absolute/path/settings.xml"
RELEASE_MODULES='agentforge-ai-parent,agentforge-ai-bom,agentforge-model,agentforge-model/agentforge-model-api,agentforge-model/agentforge-model-core,agentforge-model/agentforge-model-openai,agentforge-model/agentforge-model-anthropic,agentforge-model/agentforge-model-registry,agentforge-framework,agentforge-framework/agentforge-agent-core'

mvn -s "$SETTINGS_FILE" \
  -P release \
  -Drevision=1.0.0 \
  -DskipTests \
  -Dgpg.skip=true \
  -pl "$RELEASE_MODULES" \
  verify
预期结果:日志中出现 Inspecting build with total of 10 modules、Installing Central Publishing features 和最终的 BUILD SUCCESS。每个 JAR 模块的 target/ 中应同时存在:
<artifactId>-1.0.0.jar
<artifactId>-1.0.0-sources.jar
<artifactId>-1.0.0-javadoc.jar
-Dgpg.skip=true只用于第五步的 POM / 构件结构验证;第六步预演和正式发布必须移除它,确保 Central 收到.asc签名。
六、实战发布与一键部署
本节是 AgentForge 1.0.0 真实跑通后整理的线性 Runbook。后续发布人员不需要手工拼 Maven 参数,从 6.1 开始按顺序执行,任何一步失败都不要继续下一步。
一键脚本位于 bin/local/release.sh,说明位于 bin/local/README.md。脚本会自动限定 10 个公开库模块、排除 examples / studio、探测 GPG 绝对路径并在 Maven 前做独立签名预检。
6.1 步骤 0:创建一键发布脚本
在仓库根目录创建 bin/local/release.sh,完整内容如下:
#!/usr/bin/env bash
set -euo pipefail

readonly RELEASE_MODULES='agentforge-ai-parent,agentforge-ai-bom,agentforge-model,agentforge-model/agentforge-model-api,agentforge-model/agentforge-model-core,agentforge-model/agentforge-model-openai,agentforge-model/agentforge-model-anthropic,agentforge-model/agentforge-model-registry,agentforge-framework,agentforge-framework/agentforge-agent-core'

usage() {
    cat <<'EOF'
Usage: bin/local/release.sh <version> [options]

Options:
  --settings <file>  Maven settings.xml (default: $MAVEN_SETTINGS or ~/.m2/settings.xml)
  --dry-run          Build and sign the release artifacts without uploading
  --auto-publish     Upload and publish automatically instead of waiting in Portal
  --skip-tests       Skip tests (not recommended for a formal release)
  -h, --help         Show this help
EOF
}

[[ $# -gt 0 ]] || { usage; exit 1; }
if [[ "$1" == '-h' || "$1" == '--help' ]]; then
    usage
    exit 0
fi

VERSION="$1"
shift
SETTINGS_FILE="${MAVEN_SETTINGS:-${HOME}/.m2/settings.xml}"
DRY_RUN=0
AUTO_PUBLISH=0
SKIP_TESTS=0

while [[ $# -gt 0 ]]; do
    case "$1" in
        --settings)
            [[ $# -ge 2 ]] || { echo 'Error: --settings requires a file path.' >&2; exit 1; }
            SETTINGS_FILE="$2"
            shift 2
            ;;
        --dry-run) DRY_RUN=1; shift ;;
        --auto-publish) AUTO_PUBLISH=1; shift ;;
        --skip-tests) SKIP_TESTS=1; shift ;;
        -h|--help) usage; exit 0 ;;
        *) echo "Error: unknown option: $1" >&2; usage; exit 1 ;;
    esac
done

[[ "$VERSION" =~ ^[0-9]+\.[0-9]+\.[0-9]+([.-][A-Za-z0-9]+)*$ ]] || {
    echo "Error: invalid release version: $VERSION" >&2
    exit 1
}
[[ "$VERSION" != *-SNAPSHOT ]] || { echo 'Error: a Central release cannot use -SNAPSHOT.' >&2; exit 1; }
[[ -f "$SETTINGS_FILE" ]] || { echo "Error: settings.xml not found: $SETTINGS_FILE" >&2; exit 1; }
command -v mvn >/dev/null || { echo 'Error: mvn was not found in PATH.' >&2; exit 1; }

# GUI Terminal 的 PATH 可能没有 MacPorts / Homebrew,因此显式探测 GPG。
GPG_EXECUTABLE="${GPG_EXECUTABLE:-}"
if [[ -z "$GPG_EXECUTABLE" ]]; then
    for candidate in "$(command -v gpg 2>/dev/null || true)" /opt/local/bin/gpg /opt/homebrew/bin/gpg /usr/local/bin/gpg; do
        if [[ -n "$candidate" && -x "$candidate" ]]; then
            GPG_EXECUTABLE="$candidate"
            break
        fi
    done
fi
[[ -n "$GPG_EXECUTABLE" ]] || { echo 'Error: gpg was not found.' >&2; exit 1; }
export GPG_TTY="${GPG_TTY:-$(tty)}"

# 口令隐藏输入,不放入命令行、POM 或 settings.xml。
if [[ -z "${MAVEN_GPG_PASSPHRASE:-}" ]]; then
    printf 'GPG Passphrase (input hidden): '
    IFS= read -r -s MAVEN_GPG_PASSPHRASE
    printf '\n'
    [[ -n "$MAVEN_GPG_PASSPHRASE" ]] || { echo 'Error: GPG Passphrase cannot be empty.' >&2; exit 1; }
    export MAVEN_GPG_PASSPHRASE
fi

# Maven 前先对临时文件签名和验签,尽早发现错误口令或 GPG 配置。
SIGN_CHECK_FILE="$(mktemp /tmp/agentforge-gpg-check.XXXXXX)"
cleanup_sign_check() {
    rm -f "$SIGN_CHECK_FILE" "${SIGN_CHECK_FILE}.asc"
}
trap cleanup_sign_check EXIT
printf 'AgentForge Maven Central signing check\n' > "$SIGN_CHECK_FILE"
if ! printf '%s\n' "$MAVEN_GPG_PASSPHRASE" | "$GPG_EXECUTABLE" \
    --batch --yes --no-tty --pinentry-mode loopback --passphrase-fd 0 \
    --armor --detach-sign "$SIGN_CHECK_FILE"; then
    echo 'Error: GPG preflight signing failed. Enter the private-key Passphrase created with this GPG key.' >&2
    echo '       Do not enter the Central Token, KEY_ID, fingerprint, or macOS login password.' >&2
    exit 1
fi
"$GPG_EXECUTABLE" --batch --verify "${SIGN_CHECK_FILE}.asc" "$SIGN_CHECK_FILE"
cleanup_sign_check
trap - EXIT

MVN_ARGS=(
    -s "$SETTINGS_FILE"
    -P release
    "-Drevision=${VERSION}"
    "-Dgpg.executable=${GPG_EXECUTABLE}"
    -pl "$RELEASE_MODULES"
)
[[ "$SKIP_TESTS" -eq 1 ]] && MVN_ARGS+=(-DskipTests)

echo ">> version=$VERSION dryRun=$DRY_RUN autoPublish=$AUTO_PUBLISH"
echo ">> settings=$SETTINGS_FILE"
echo ">> gpg=$GPG_EXECUTABLE"

if [[ "$DRY_RUN" -eq 1 ]]; then
    mvn "${MVN_ARGS[@]}" clean verify
    echo '>> Dry run succeeded: artifacts were built and signed; nothing was uploaded.'
    exit 0
fi

if [[ "$AUTO_PUBLISH" -eq 1 ]]; then
    MVN_ARGS+=(-Dcentral.publishing.autoPublish=true -Dcentral.publishing.waitUntil=published)
fi

mvn "${MVN_ARGS[@]}" clean deploy

if [[ "$AUTO_PUBLISH" -eq 1 ]]; then
    echo '>> Central deployment was uploaded and automatic publishing was requested.'
else
    echo '>> Central deployment was uploaded. Review and publish it in the Portal:'
    echo '   https://central.sonatype.com/publishing/deployments'
fi
脚本中不要填写任何 Token、Passphrase 或私钥内容。
6.2 步骤 1:进入仓库并设置本次发布参数
cd "/absolute/path/AgentForge"

VERSION="1.0.0"
SETTINGS_FILE="/absolute/path/settings.xml"
VERSION 必须是从未在 Central 发布过的非 SNAPSHOT 版本。SETTINGS_FILE 必须位于 Git 仓库外。
6.3 步骤 2:发布前自检
先依次执行:
chmod +x bin/local/release.sh
chmod 600 "$SETTINGS_FILE"

# 脚本语法与用法
bash -n bin/local/release.sh
bin/local/release.sh --help

# settings.xml 必须存在;macOS 可额外用 xmllint 检查 XML
test -f "$SETTINGS_FILE"
xmllint --noout "$SETTINGS_FILE"

# 必须能看到至少一把 sec 私钥
GPG_BIN="$(command -v gpg || true)"
[[ -x /opt/local/bin/gpg ]] && GPG_BIN="/opt/local/bin/gpg"
[[ -x /opt/homebrew/bin/gpg ]] && GPG_BIN="/opt/homebrew/bin/gpg"
"$GPG_BIN" --list-secret-keys --keyid-format LONG

# 检查工作树;正式发布建议使用可追溯的 commit/tag
git status --short

# 404 表示该版本尚未出现在 Central;200 时必须换新版本
curl -sS -o /dev/null -w '%{http_code}\n' \
  "https://repo1.maven.org/maven2/cloud/changlu/agentforge/agentforge-ai-parent/${VERSION}/agentforge-ai-parent-${VERSION}.pom"
同时在 Central Portal 确认命名空间为 Verified、settings.xml 中存在 <server id="central">、GPG 公钥已上传 keyserver。
6.4 步骤 3:一键预演(不上传)
bin/local/release.sh "$VERSION" \
  --settings "$SETTINGS_FILE" \
  --dry-run
执行时脚本会提示:
GPG Passphrase (input hidden):
输入创建当前 GPG 私钥时设置的 Passphrase。输入不回显,也不会进入 shell 历史。成功时应出现:
[INFO] BUILD SUCCESS
>> Dry run succeeded: artifacts were built and signed; nothing was uploaded.
本次实战结果:10 个模块全部 SUCCESS,真实生成的 28 个 .asc 全部本地验签成功。
经验:不要用
-Dgpg.skip=true做最终预演,那只能验证 POM 和构件结构,无法证明真实签名链路可用。
6.5 步骤 4:一键上传(首次推荐)
bin/local/release.sh "$VERSION" \
  --settings "$SETTINGS_FILE"
该模式执行 clean deploy,但 POM 中 autoPublish=false,因此只上传至 Central Portal,不会立即公开。成功标志:
[INFO] BUILD SUCCESS
>> Central deployment was uploaded. Review and publish it in the Portal:
   https://central.sonatype.com/publishing/deployments
本次真实上传前的 Bundle 检查结果:
- Bundle 大小约
1.8 MB; - 共
168个条目; - 正好包含 10 个公开 artifact;
- 不包含 examples / studio;
- POM、主 JAR、sources JAR、Javadoc JAR 及对应
.asc齐全。
示范案例:
# 打开AgentForge
cd "/Users/edy/changlu_workspace/mymd/我的开源项目/AgentForge"

# 执行一键推送
bin/local/release.sh 1.0.0 \
    --settings "/Users/edy/changlu_workspace/mymd/我的开源项目/maven/settings.xml" \
    --dry-run
输入的Passphrase为安装 GPG自己设置的密钥~
6.6 步骤 5:Portal 核对与 Publish
打开 https://central.sonatype.com/publishing/deployments:
-
确认 deployment 的版本和构件数量正确;
-
等待状态变为 VALIDATED;
-
首次发布建议人工检查后点击 Publish;
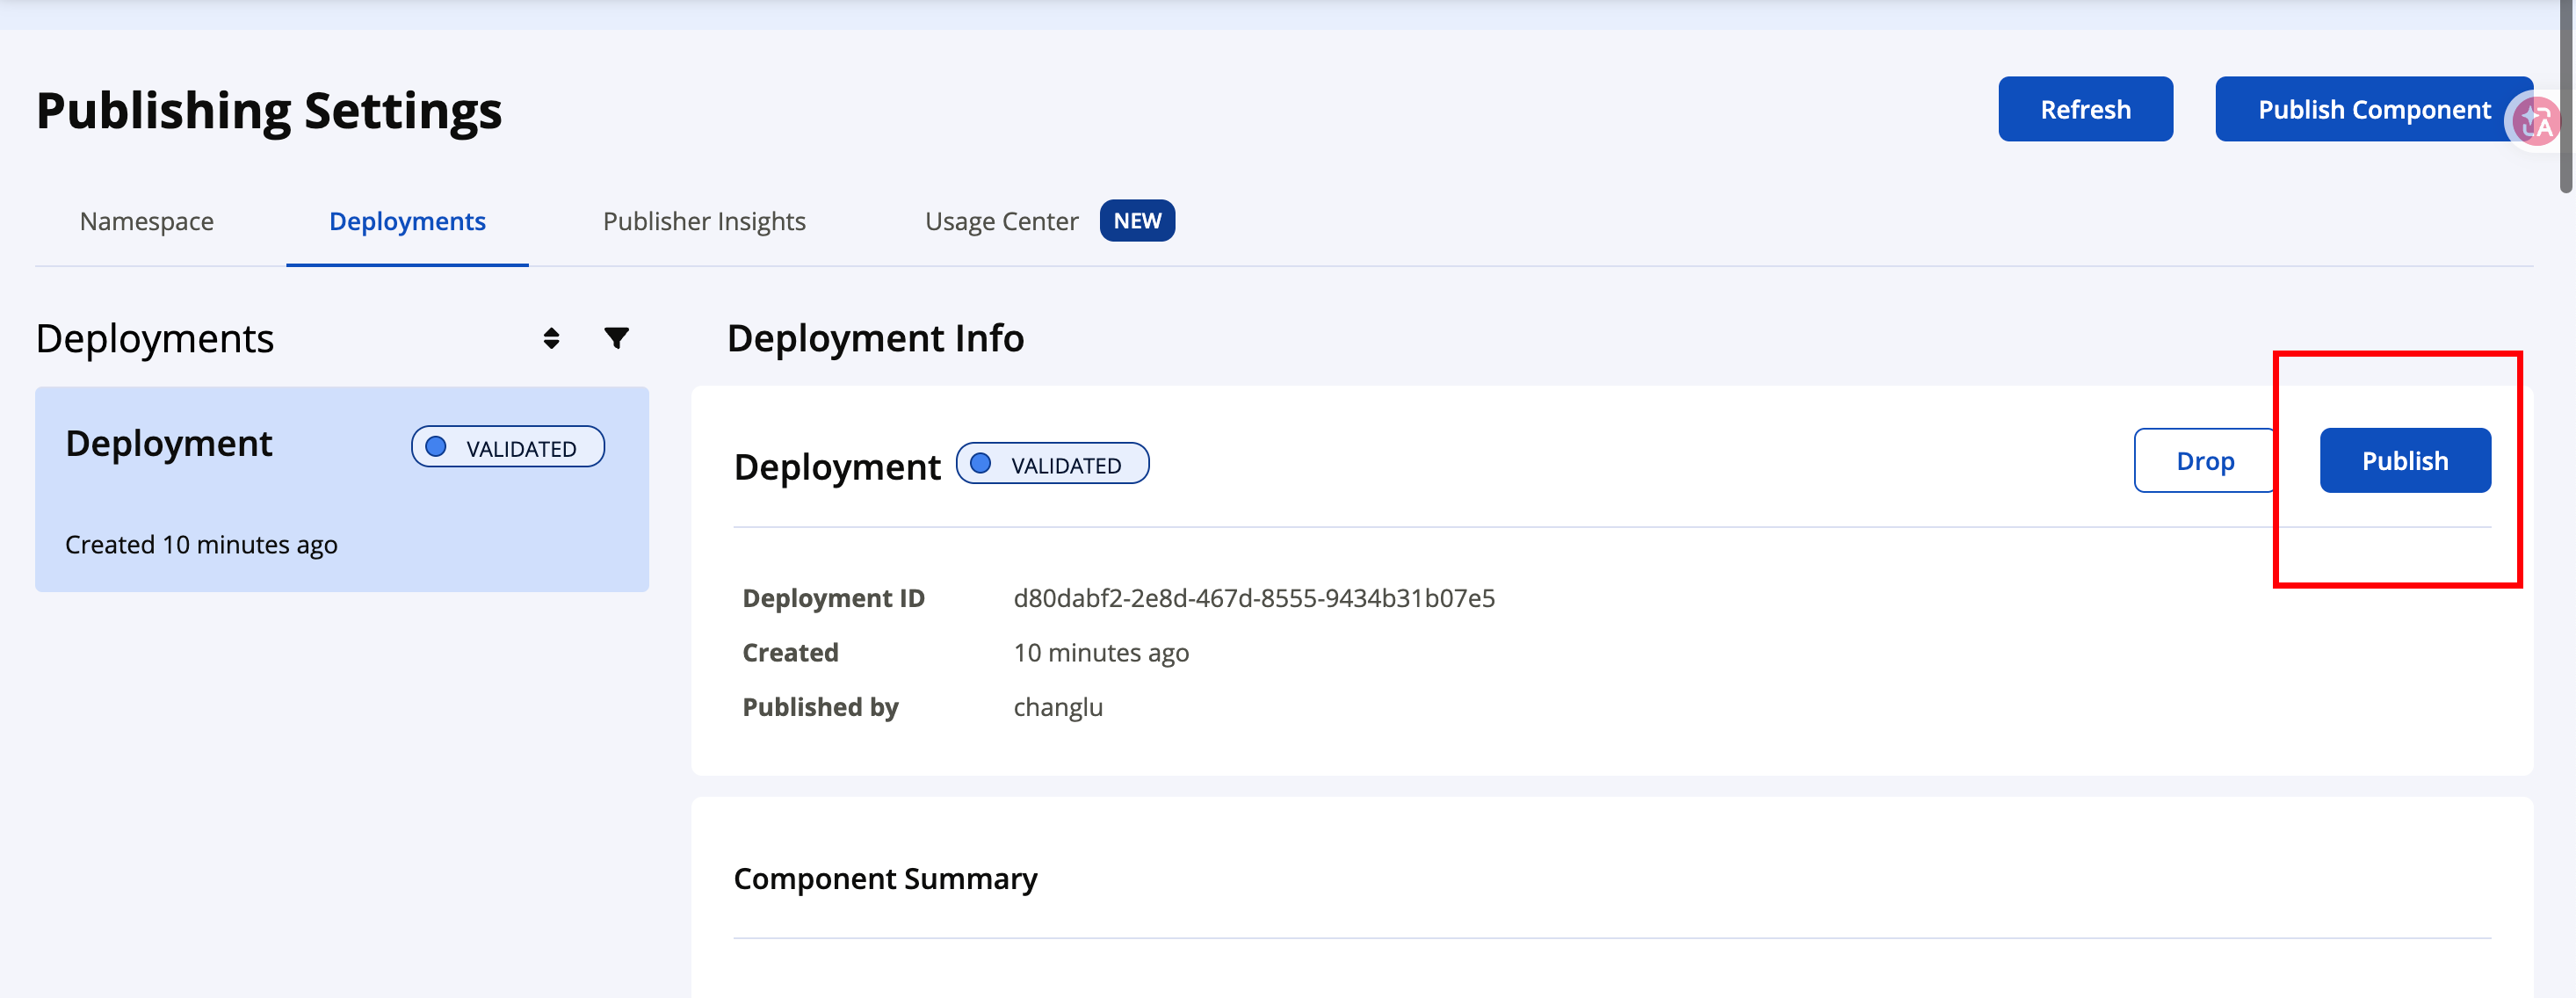
此时会进入到publishing过程中:
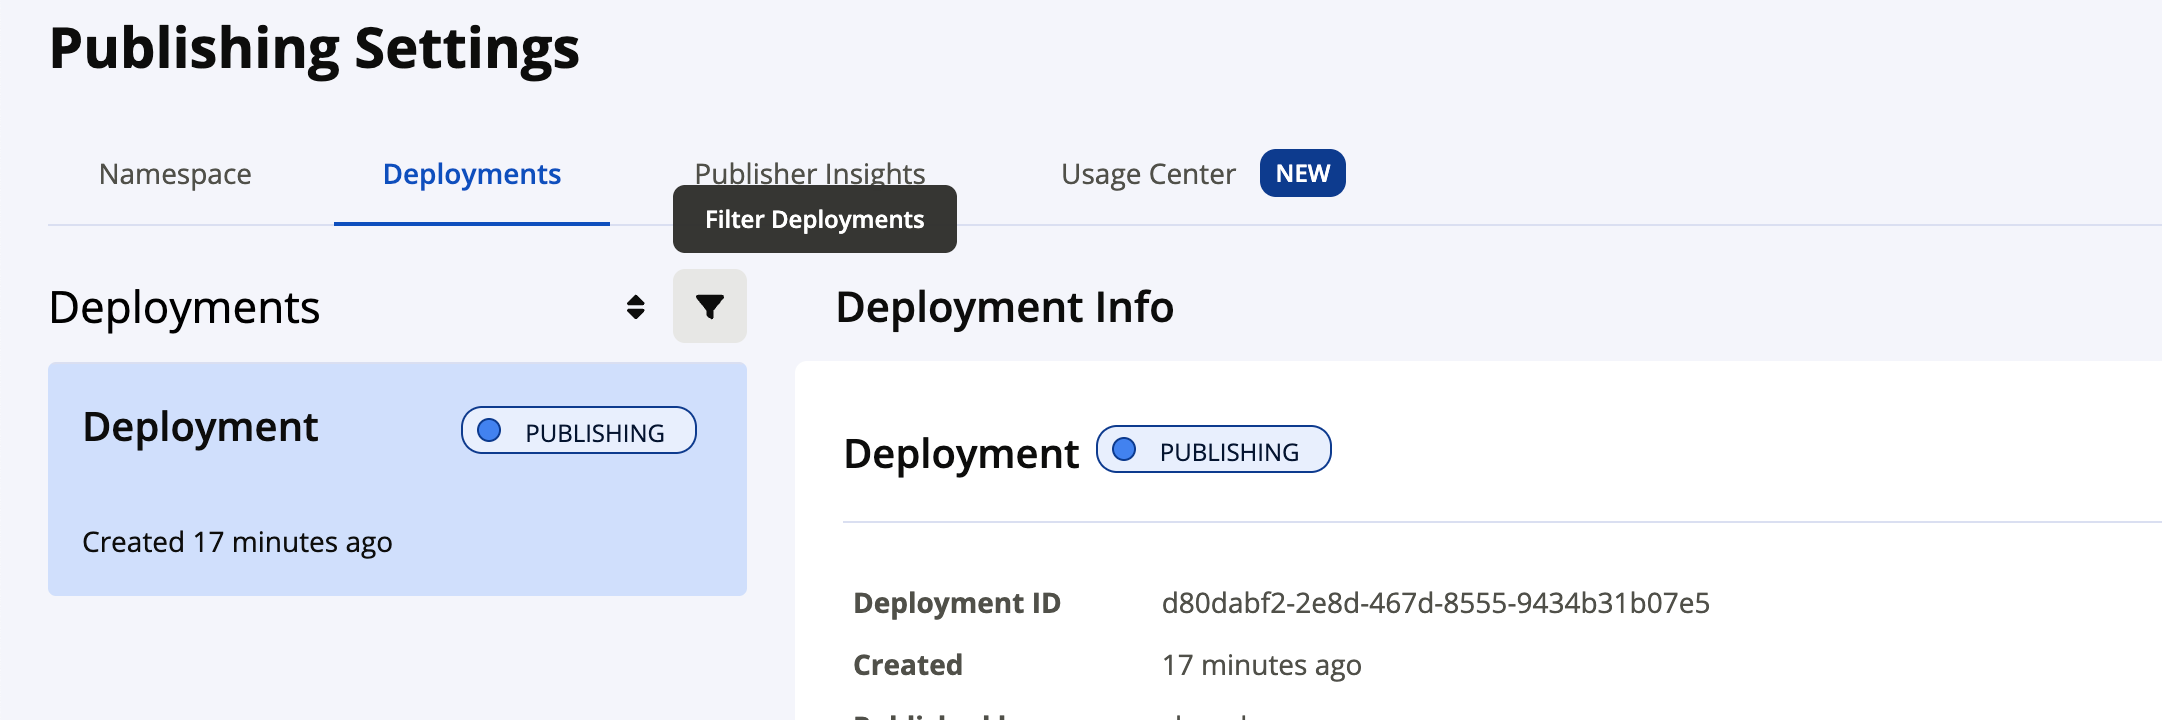
-
等待状态变为 PUBLISHED。
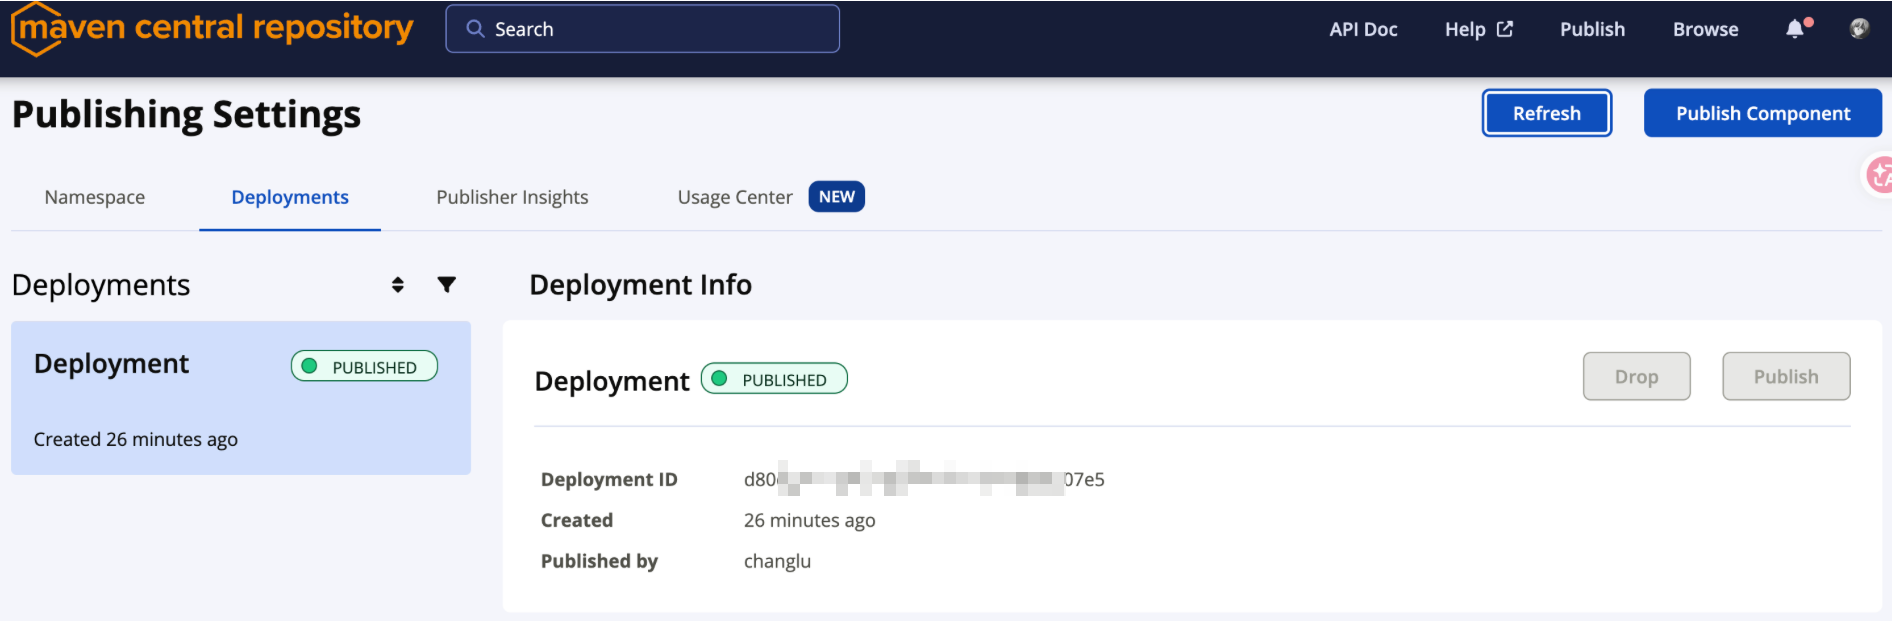
Publish 是不可逆操作。Central 上已发布的 GAV 版本不能覆盖,所以不建议首次直接使用自动 Publish。
Publish 后的等待时间:
- 点击 Publish 后,
VALIDATED通常会立即进入PUBLISHING; PUBLISHING → PUBLISHED一般需要几分钟,常见约1~10分钟;PUBLISHED后同步到repo1.maven.org通常还需要几分钟;- Central Search 索引通常在发布后几分钟内更新,但可能比公共仓库更晚。
建议每隔 1~2 分钟刷新一次 Deployments 页面,不要重复上传。状态变为 PUBLISHED 后,可直接检查公共仓库:
curl -sS -L -o /dev/null -w '%{http_code}\n' \
  'https://repo1.maven.org/maven2/cloud/changlu/agentforge/agentforge-agent-core/1.0.0/agentforge-agent-core-1.0.0.pom'
返回 200 表示已公开可用;返回 404 则继续等待同步。如果超过 30 分钟仍停留在 PUBLISHING,先查看 https://status.maven.org/;超过 1 小时仍未完成,记录 deployment ID 并联系 central-support@sonatype.com。
6.7 步骤 6(后续版本可选):一键自动 Publish
VERSION="1.0.1"
bin/local/release.sh "$VERSION" \
  --settings "$SETTINGS_FILE" \
  --auto-publish
--auto-publish 会动态覆盖 POM 的 autoPublish=false,并使用 waitUntil=published 等待 Central 完成发布。只应在首次人工发布验证成功后使用。
6.8 步骤 7:发布后验证
-
Portal Deployments 状态为 PUBLISHED;
-
在 https://central.sonatype.com/ 搜索完整 groupId
cloud.changlu.agentforge或 artifactIdagentforge-agent-core; -
直接检查
repo1.maven.org/maven2/<groupId 路径>/<artifactId>/<version>/; -
在空白 Maven 项目中真实引用:
<dependency>
    <groupId>cloud.changlu.agentforge</groupId>
    <artifactId>agentforge-agent-core</artifactId>
    <version>1.0.0</version>
</dependency>
可先用 HTTP 状态做无缓存的核心验证:
curl -sS -L -o /dev/null -w '%{http_code}\n' \
  'https://repo1.maven.org/maven2/cloud/changlu/agentforge/agentforge-agent-core/1.0.0/agentforge-agent-core-1.0.0.pom'
200:构件已进入 Maven Central 公共仓库;404且 Portal 是VALIDATED:只完成上传,还需在 Deployments 页点击 Publish;- Portal 是
PUBLISHING:继续等待,不要重复上传; - Portal 是
PUBLISHED但仍为404:公共仓库正在同步,稍后重试; repo1.maven.org已返回200但 Central Search 搜不到:只是搜索索引延迟。
Portal 显示 PUBLISHED 后,同步到 Central Search 和镜像仓库仍可能需要几十分钟,以 Portal 状态和
repo1.maven.org为准。脚本不包含任何凭据:Central Token 仅从settings.xml读取,GPG Passphrase 仅存在于当前发布进程。
七、常见问题与注意事项
| 问题 | 说明 / 处理 |
|---|---|
| 命名空间校验失败 | 确认 TXT 记录加在根域名 changlu.cloud 上,值完全一致,并用 dig -t txt changlu.cloud 验证 |
Invalid signature / GPG 报错 |
确认 KEY_ID 正确、公钥已上传、MAVEN_GPG_PASSPHRASE 口令正确;gpg 版本 ≥ 2.2 |
损坏的密码 / Bad passphrase |
输入的必须是创建当前 GPG 私钥时设置的 Passphrase,不是 Central Token、KEY_ID、指纹或 macOS 密码;忘记后无法反查,需换新密钥 |
| bundle 缺 sources/javadoc | 检查 -P release 是否生效,javadoc 是否因源码报错中断(已加 doclint=none) |
| POM 缺 metadata | 确认 parent 有 licenses/developers/scm,各模块有 name/description/url |
| 版本已存在 | Central 不可覆盖 / 删除已发布版本,必须换新版本号 |
-SNAPSHOT 被拒 |
正式版必须非 SNAPSHOT,快照走独立通道,不混用 |
| 上传后搜不到 | 同步有延迟,先看 Portal Deployments 的 Published 状态 |
| 示例模块被打包 | 确认 excludeArtifacts 生效,或先 --dry-run 检查 bundle 内容 |
八、总结
发布到 Maven Central 的完整路径可以归纳为:
- 选命名空间:无域名用
io.github.<username>,有域名用反向域名(本方案选cloud.changlu); - 过校验:域名方式加 DNS TXT,GitHub 方式建公开仓库;
- 备密钥与口令:GPG 密钥对 + Portal User Token +
settings.xml; - 改构建:parent 里补元数据与
releaseprofile(sources / javadoc / gpg / central); - 跑发布:
--dry-run预演 → 正式deploy→ Portal Publish → 验证依赖; - 可持续:用
release.sh固化流程,版本号递增,永不覆盖。
至此,AgentForge 的库模块即可被全世界的 Java 开发者通过一段依赖坐标直接引入。
参考资料
[1]. Sonatype Central Portal 官方文档
[2]. Choosing your Coordinates(groupId 命名空间)
[3]. Requirements(sources/javadoc、GPG、POM 元数据)
[4]. Publishing By Using the Maven Plugin
[5]. Generating a Portal Token for Publishing
[6]. How do I set the TXT record needed to prove ownership of my Web Domain?
[7]. GPG Requirements
[8]. central-publishing-maven-plugin(Maven Central Artifact)
整理者:长路 创建时间:2026.10.4 更新时间:2026.10.5
评论区请在客户端页面查看