- 前言
- 微服务阶段
- 学习内容
- 一、springboot快速入门
- 1、什么是spring
- 2、什么是SpringBoot
- 二、微服务
- 1、什么是微服务?
- 2、单体服务架构
- 3、微服务架构
- 三、第一个Springboot程序
- 1、官网创建项目
- 查看项目结构
- 实际应用
- ①创建一个HelloController
- ②打jar包来手动运行(√)
- 2、手动创建项目
- 添加web依赖
- 创建Controller与设置端口(√)
- 自定义banner图标(√)
- 热部署(√)
- 四、原理初探
- pom.xml配置
- 主程序
- @SpringBootApplication深入
- SpringApplication.run介绍
- 测试类
- 五、配置文件
- 前提介绍
- 1、properties配置
- 配置文件两种方式
- 2、yaml配置(推荐)
- 格式说明
- 属性赋值
- yaml其他使用方式
- 两个注入注解的比对说明
- 3、JSR303数据校验
- 介绍及导入
- 实际使用(@Email)
- IDEA的FileEncoding问题
- 六、配置优先级及多环境配置
- 1、配置优先级
- 2、多环境配置
- properties配置文件
- yaml配置文件
- 七、自动装配原理
- 探索spring.factories
- debug=true使用
- 参考资料
前言
本篇博客是根据【狂神说Java】SpringBoot最新教程IDEA版通俗易懂 整理的学习笔记,若文章中出现相关问题,请指出!
所有博客文件目录索引:博客目录索引(持续更新)
微服务阶段
javase:OOP
mysql:数据持久化
html+css+js+jquery+框架:视图,框架不熟练,css不好;
javaweb:独立开发MVC三层架构的网站:原始
ssm:框架,简化了我们的框架,配置也开始较为复杂;wai包:tomcat运行
spring再简化:Springboot 微服务架构!使用jar包,内嵌tomcat
之后服务越来越多:使用springcloud
学习内容
springboot:大致介绍
- 是什么
- 配置如何编写,使用ymal
- 自动配置原理:重要,谈资
- 集成web开发,业务的核心
- 集成数据库,例如JDBC、Druid、Mybatis
- swagger:接口文档
- 异步任务,邮件发送,任务调度
- SpringSecurity,shiro
- 分布式开发:Dubbo(RPC)+zookeeper
springcloud
- 微服务
- springcloud入门
- Restful
- Eureka
- Nginx,负载均衡
- Ribbon
- Feign
- HyStrix:
- Zuul路由网关
- SpringCloud config:git
一、springboot快速入门
1、什么是spring
Spring是一个开源框架,2003年兴起的轻量级Java开发框架,Sprng是为了解决企业及应用开发的复杂性而创建的,简化开发。
- 基于Pojo的轻量级和最小侵入式编程
- 通过IOC,依赖注入(DI)和面向接口实现松耦合
- 基于切面(AOP)和惯例进行声明式编程
- 通过切面和模板样式代码
2、什么是SpringBoot
官网:https://spring.io/
springboot取代了ssm中的ss角色
javaweb-> struts -> springmvc,其中structs很多的请求是.do结尾的。之后出来springboot主流微服务的,甚至现在出来了新服务架构:服务网格。
Springboot就是一个javaweb的开发框架,和springmvc类似,对比其他javaweb框架好处,更加简化开发,约定大于配置,迅速开发web应用,几行代码就能开发一个http接口。
能够默认帮我们进行很多设置,多数springboot应用只需要很少的Spring配置。同时集成了大量的第三方库配置(Redis、MongoDB、Jpa、RabbitMQ、Quartz等),这些第三方库几乎可以零配置。
二、微服务
1、什么是微服务?
微服务是一种架构风格,例如MVC三层架构 MVVM 微服务架构
实际上将业务拆封为模块,例如service-》模块、controller-》接口。要求在开发一个应用的时候,这个应用必须构建成一系列小服务的组合,可以通过进行http的方法进行互通。
2、单体服务架构
单体服务架构(all in one)是指我们讲一个应用中的所有应用服务都封装到一个应用中。
无论是ERP、CRM或是其他什么系统,都要将数据库访问、web访问等功能放到war包内。
好处:
- 易于开发和测试,方便部署
- 需要扩展时,复制多份war包,放到多台服务器上,使用负载均衡
坏处:
- 修改一个很小的地方,需要停掉整个服务,重新打包,部署war包
- 对于一个大型应用,不可能把所有内容放在一个应用里面,如何维护分工都是问题!
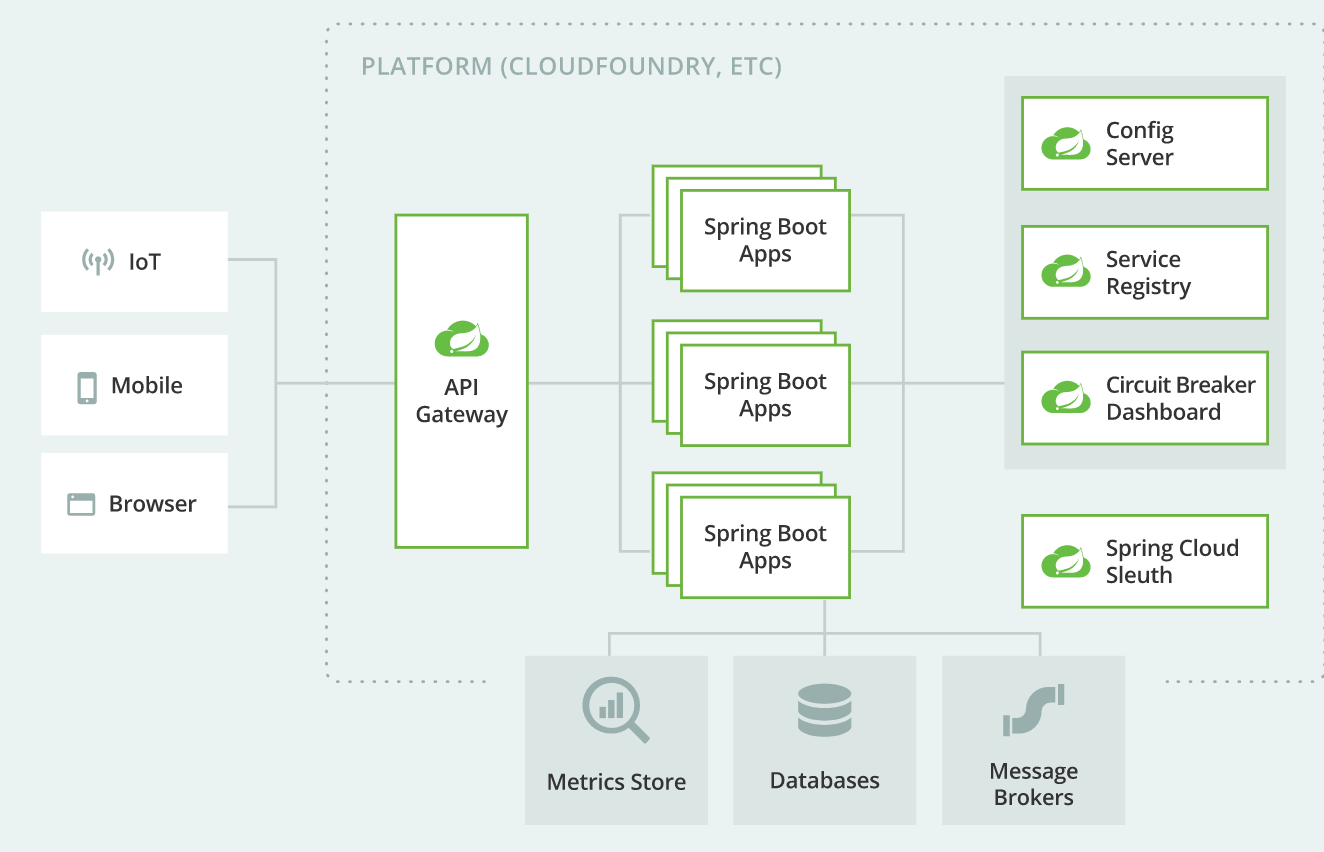
3、微服务架构
打破all in one的方式,将每个功能元素独立出来,把独立出来的功能元素动态组合,需要的功能元素拿来组合,需要多一些时可以整合多个功能元素。所以微服务架构是对功能元素进行复制,而不是对整个应用进行复制。
好处:
- 节省调用资源
- 每个功能元素的服务都是一个可替换的、可独立升级的软件代码
三、第一个Springboot程序
1、官网创建项目
前提准备
- jdk1.8
- maven 3.6.1
- springboot:最新版
- 开发工具:IDEA
初次创建使用官网下载的项目来进行
创建项目有两种方式:
- 在官网:https://spring.io/projects/spring-boot#overview 最下面的quick start来进行创建项目(jar包)
- 创建项目->Spring Initializr(1.8,default) -> jdk版本设置,工程包名 -> 选择Springweb,创建完成
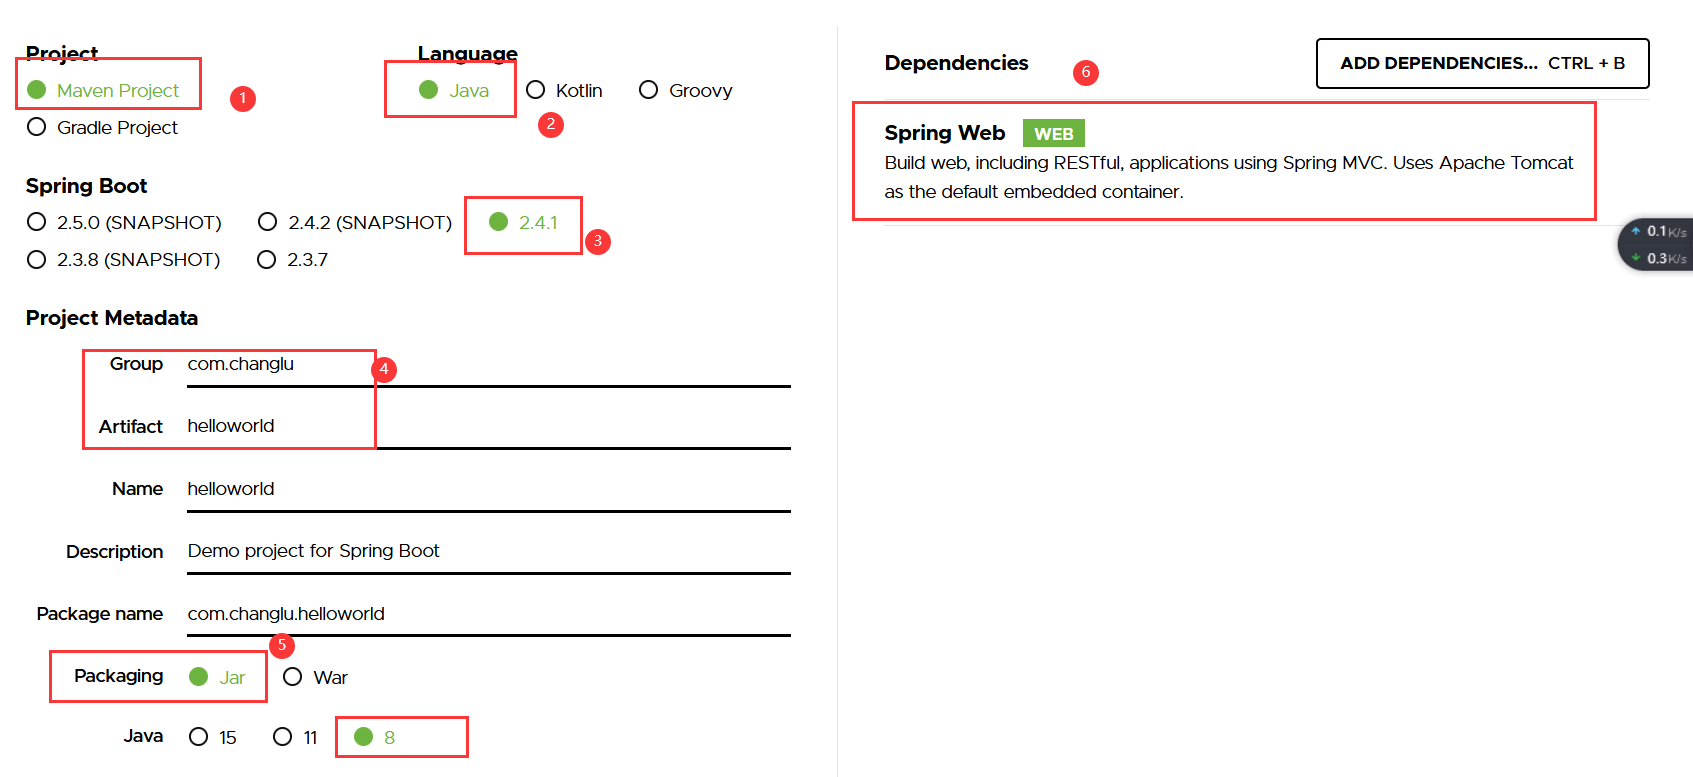
点击explore直接下载项目到本地,IDEA导入打开即可!!!
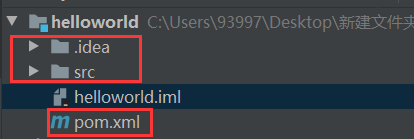
将没有用的直接删除掉,仅仅留下下面几个部分(注意.iml初步导入是没有的,我这里是后来截图的)
查看项目结构
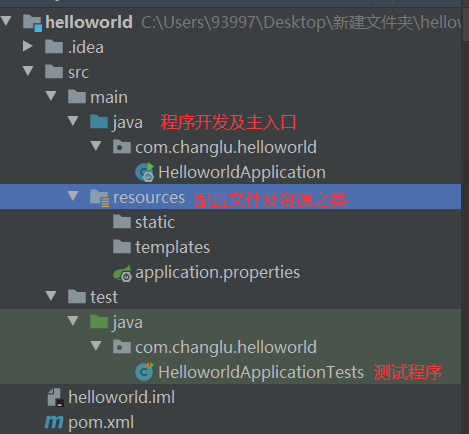
建议开发目录都在根目录下面,这里是/com/changlu/helloworld/下,可以添加入controller、service、model、pojp目录等
看一下resource目录中的结构:
- static:保存所有的静态资源,什么js、css之类的都在这下面
- templates:保存所有的模板页面,Springboot默认jar包使用的是嵌入式的Tomcat,默认不支持JSP页面,所以在模板这里,我们可以使用模板引擎,比如freemaker、thymeleaf之类的
- application.properties,这个是SpringBoot的配置文件。前面我们知道SpringBoot有很多默认配置,我们就可以在这个文件夹修改默认配置,比如端口之类的。
① HelloworldApplication.java
暂且知道该类是springboot的启动类即可
//程序主配置入口
@SpringBootApplication
public class HelloworldApplication {

   public static void main(String[] args) {
      SpringApplication.run(HelloworldApplication.class, args);
   }

}
启动即可看到如下内容:
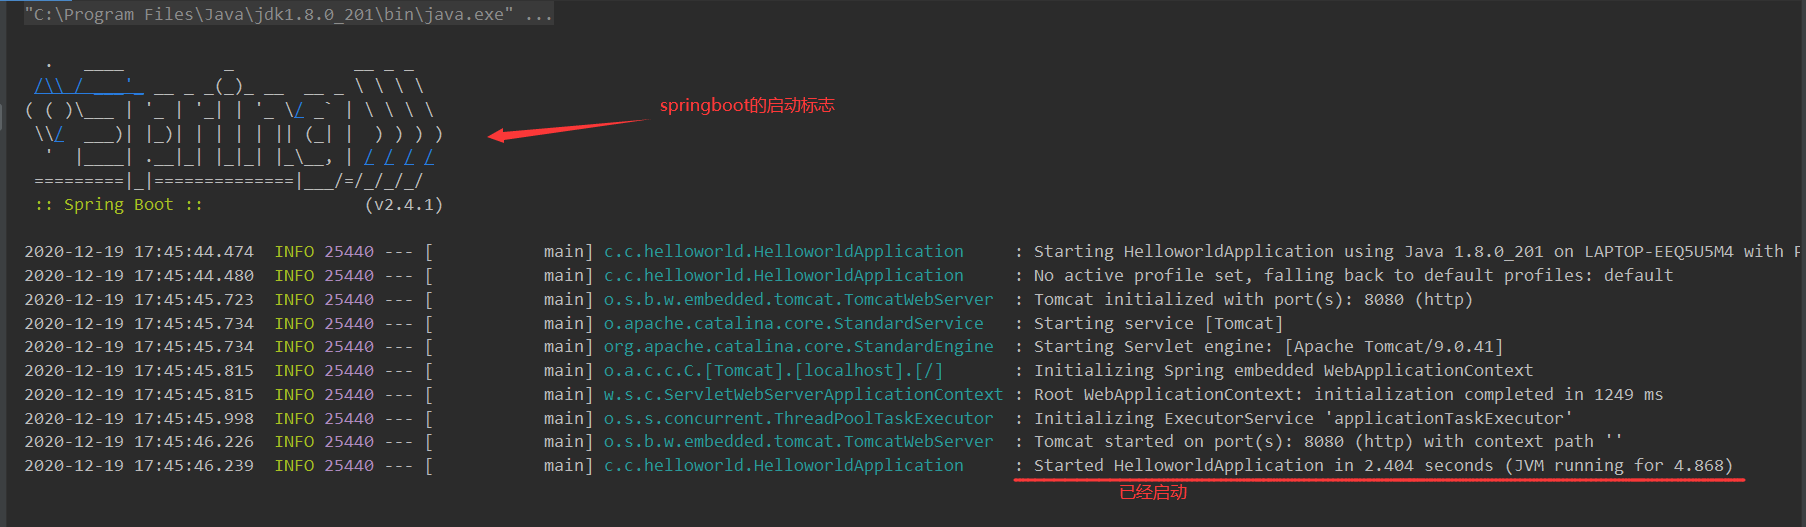
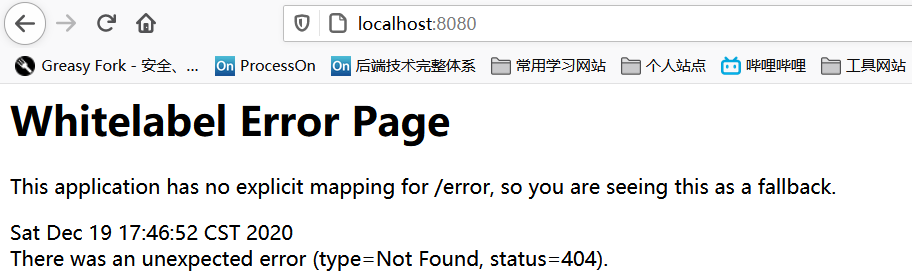
访问一下看看:我们初始可以使用http://localhost:8080/以及http://localhost:8080/error来进行访问
② 看一下pom.xml中的web配置
首先看下spring-boot-starter-web:该依赖集成了tomcat、dispatcherservlet、spring-web(beans、core)、spring-webmvc(content、core、expression)
<dependency>
   <groupId>org.springframework.boot</groupId>
   <artifactId>spring-boot-starter-web</artifactId>
</dependency>
默认包含两个模块:
spring-boot-starter:启动器,核心模块,包括自动配置支持、日志和YAML,如果引入了spring-boot-starter-web,web模块可以去掉此配置,因为我们可以看到其中自动依赖了spring-boot-starter。实际配置文件中就是spring-boot-starter-web!spring-boot-starter-test:测试模块,包括了JUnit、Hamcrest、Mokito
实际应用
①创建一个HelloController
在Controller目录中创建一个controller类来进行接收访问请求
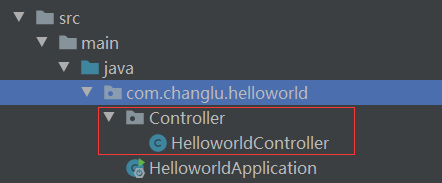
//Controller 里面的方法都以 json 格式输出,不用再写什么 jackjson 配置的了
@RestController
public class HelloworldController {

    @RequestMapping("/hello")
    public String hello(){
        return "hello,springboot!";
    }
}
访问效果:

②打jar包来手动运行(√)
在IDEA中右侧的maven-helloworld-Lifecycle,选择package打包
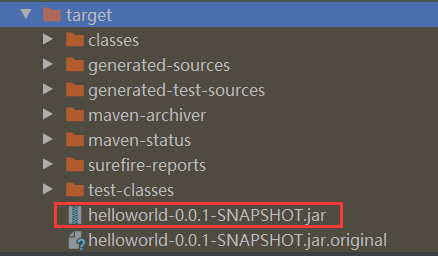
接着我们使用powershell(管理员模式)在指定文件目录中来运行jar包,命令:java -jar .\helloworld-0.0.1-SNAPSHOT.jar
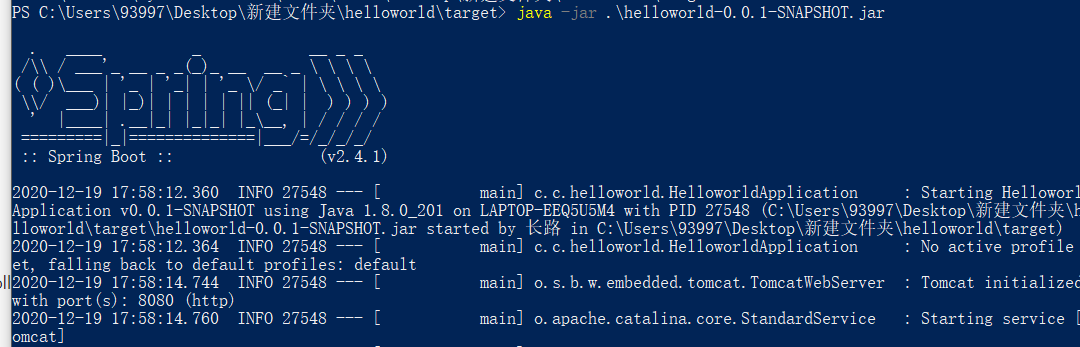
接下来可以通过访问http://localhost:8080/hello来进行测试!
2、手动创建项目
IDEA手动创建
为防止出现连接超时,我们设置对应的网址:http://start.springboot.io/
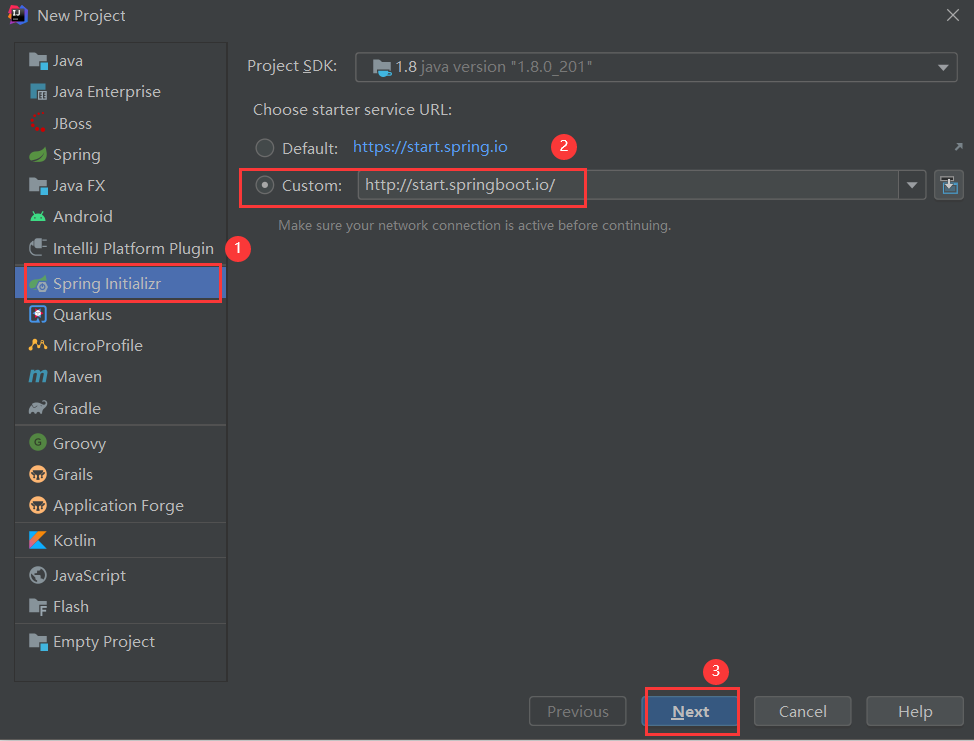

之后我们不选择web应用,之后自己手动添加依赖即可,创建完成!
若是出现连接超时,通过以下方法进行测试对应的网址
setting中设置一下:http://start.springboot.io/
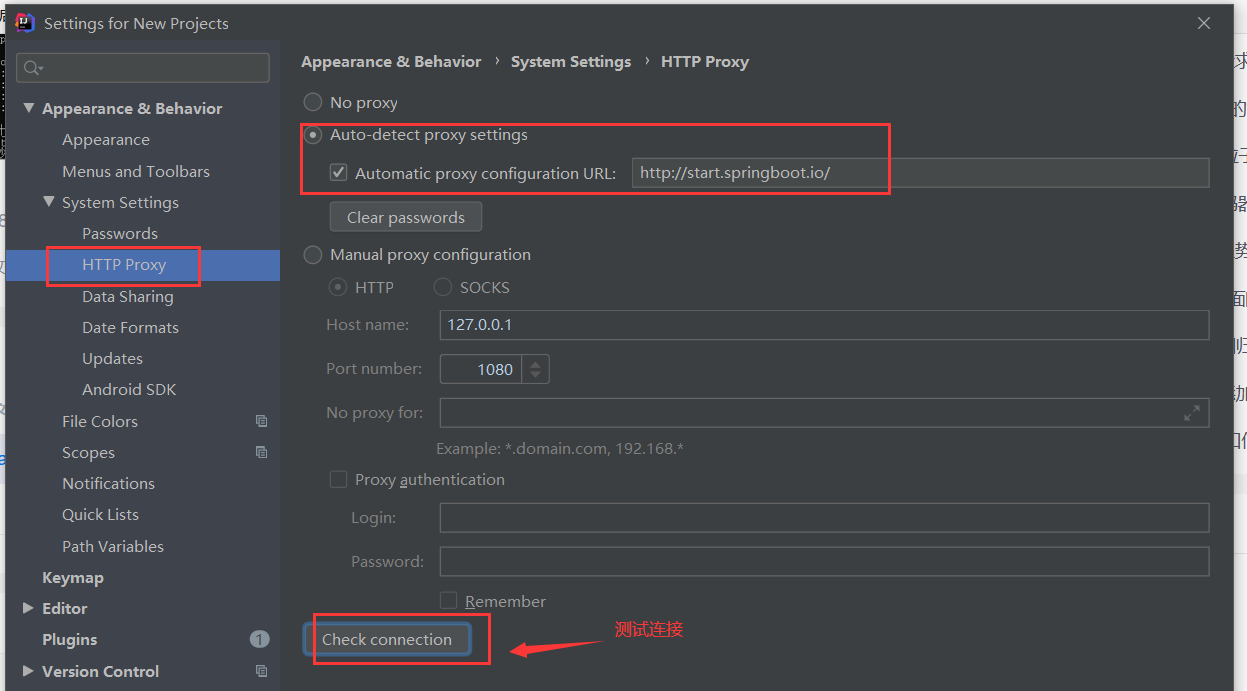
添加web依赖
因为我们手动创建时没有勾选web,所以我们需要手动引入下面的依赖,否则创建web项目
spring-boot-starter是启动器,我们使用下面的依赖就可以把其删除了
<!--spring-boot-starter-web 自动对spring-boot-starter进行依赖-->
<dependency>
    <groupId>org.springframework.boot</groupId>
    <artifactId>spring-boot-starter-web</artifactId>
</dependency>
创建Controller与设置端口(√)
设置端口:在/src/resource/application.properties
server.port=8081
创建Controller
@RestController
@RequestMapping("/hello")
public class HelloController {

    @GetMapping("/hello")
    public String hello(){
        return "hello,springboot";
    }
}
@RestController:是@Controller与@Responsebody结合@GetMapping():获取get方式的请求
访问:

自定义banner图标(√)
banner图标指的是springboot初始运行时出现的图标
初始图:
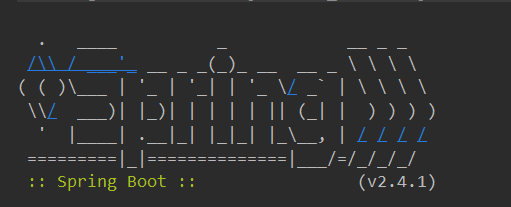
自定义方法:
在/src/resource/下创建一个banner.txt,将自定义图标的字符串放进去即可,那么自定义图标如何获取呢?
自定义banner网站:https://www.bootschool.net/ascii
////////////////////////////////////////////////////////////////////
//                          _ooOoo_                               //
//                         o8888888o                              //
//                         88" . "88                              //
//                         (| ^_^ |)                              //
//                         O\  =  /O                              //
//                      ____/`---'\____                           //
//                    .'  \\|     |//  `.                         //
//                   /  \\|||  :  |||//  \                        //
//                  /  _||||| -:- |||||-  \                       //
//                  |   | \\\  -  /// |   |                       //
//                  | \_|  ''\---/''  |   |                       //
//                  \  .-\__  `-`  ___/-. /                       //
//                ___`. .'  /--.--\  `. . ___                     //
//              ."" '<  `.___\_<|>_/___.'  >'"".                  //
//            | | :  `- \`.;`\ _ /`;.`/ - ` : | |                 //
//            \  \ `-.   \_ __\ /__ _/   .-` /  /                 //
//      ========`-.____`-.___\_____/___.-`____.-'========         //
//                           `=---='                              //
//      ^^^^^^^^^^^^^^^^^^^^^^^^^^^^^^^^^^^^^^^^^^^^^^^^^^        //
//            佛祖保佑       永不宕机     永无BUG                    //
////////////////////////////////////////////////////////////////////
注意banner.txt创建之后,该文件前面有个类似于启动的图标说明springboot检测到了该配置文件,我们运行即可看到效果了!!!
热部署(√)
对于创建使用springboot项目,我们有时候会出现错误而修改程序代码就会有一个不断重启项目的情况,针对这种情况我们使用热部署来解决,简单来说就是你修改代码可以实时生效
①主要配置:在pom.xml中配置:
<dependencies>
    <dependency>
        <groupId>org.springframework.boot</groupId>
        <artifactId>spring-boot-devtools</artifactId>
        <optional>true</optional>
    </dependency>
</dependencies>

<build>
    <plugins>
        <plugin>
            <groupId>org.springframework.boot</groupId>
            <artifactId>spring-boot-maven-plugin</artifactId>
            <configuration>
                <!--用于明确表示编译版本配置有效-->
                <fork>true</fork>
            </configuration>
        </plugin>
    </plugins>
</build>
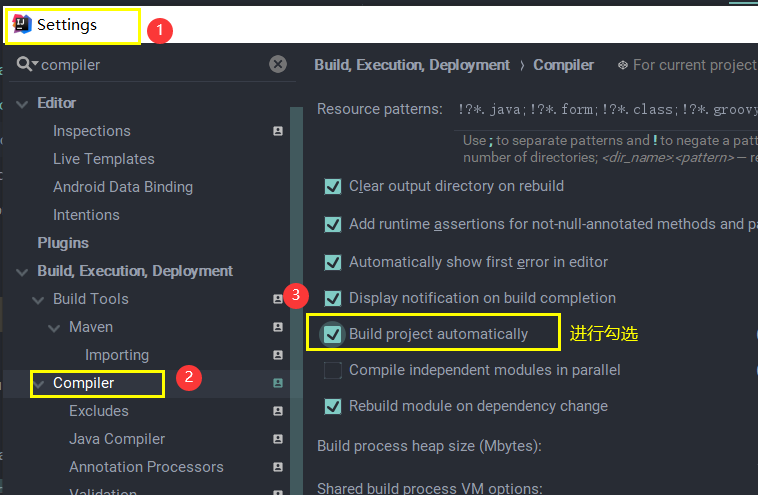
②在settings中勾选自动编译工程,让idea能够自动编译
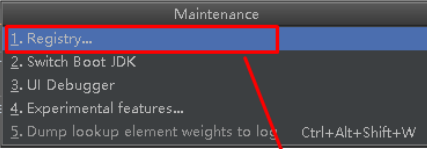
③在工程中按下Shift+Ctrl+Alt+/,选择Registry,进行勾选
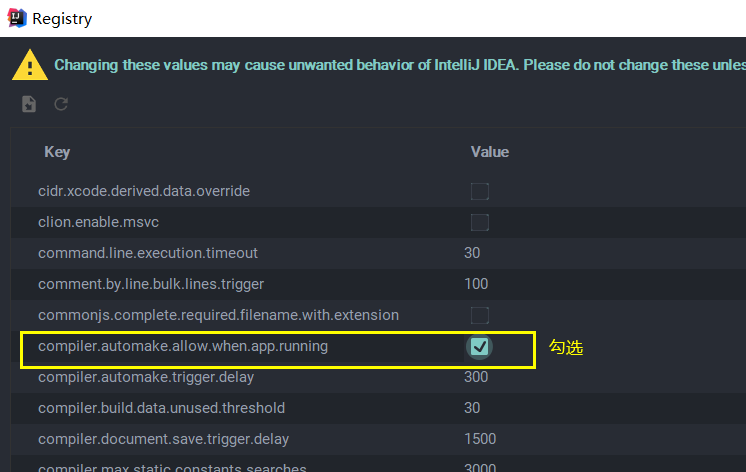
注意:如果你的springboot的热部署没有生效,看一下②③两步在你的idea中有没有配置。
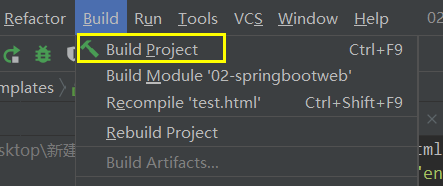
还有一个方法,就是手动使用build编译在运行时,也是可以的,如下
四、原理初探
pom.xml配置
pom.xml
- parent标签中
spring-boot-starter-parent:包含依赖spring-boot-dependencies其中包含了对应版本的核心依赖,包含资源配置文件 spring-boot-starter:启动器,其实配置spring-boot-starter-web可以代替它,自动依赖了启动器
启动器
<dependency>
    <groupId>org.springframework.boot</groupId>
    <artifactId>spring-boot-starter</artifactId>
</dependency>
启动器就是Springboot的启动场景
- 例如我们使用spring-boot-stater-web,就会帮我们自动导入web环境所有的依赖,例如Spring、springmvc、tomcat
- springboot会将所有的功能场景,都变成一个个启动器,我们需要什么功能,只需要引入对应的启动器即可
stater
查看springboot的文档:springboot-stater获取
主程序
主程序如下
//标注这个类是一个springboot的应用 启动类下的资源所有都被导入
@SpringBootApplication
public class HelloApplication {
    public static void main(String[] args) {
        //将springboot进行启用
        SpringApplication.run(HelloApplication.class, args);
    }
}
@SpringBootApplication深入
-
注解:
@SpringBootApplication下-
@SpringBootConfiguration:springboot的配置(1.1)
	@Configuration:spring的配置类(1.1.1)
		@Component:说明其是spring的组件(1.1.1.1)

@EnableAutoConfiguration:项目启动时向IOC容器中快速注入Bean,开启自动配置功能(1.2)
	@AutoConfigurationPackage:自动配置包(1.2.1)
		@Import(AutoConfigurationPackages.Registrar.class):自动注册包 配置(1.2.1.1)
	@Import(AutoConfigurationImportSelector.class):快速导入bean到IOC容器中(1.2.2)

@ComponentScan:扫描当前主启动类同级的包
-
上面部分类中详解
AutoConfigurationImportSelector(1.2.2中自动配置导入选择类中列举介绍):
//获取所有的配置
List<String> configurations = getCandidateConfigurations(annotationMetadata, attributes);

protected List<String> getCandidateConfigurations(AnnotationMetadata metadata, AnnotationAttributes attributes) {
    //加载对应启动类下的资源
    List<String> configurations = 			         SpringFactoriesLoader.loadFactoryNames(getSpringFactoriesLoaderFactoryClass(),getBeanClassLoader());
    //断言,非空
    Assert.notEmpty(configurations, "No auto configuration classes found in META-INF/spring.factories. If you "
                    + "are using a custom packaging, make sure that file is correct.");
    return configurations;
}
这里断言非空方法中出现:META-INF/spring.factories是jar包下的一个核心配置文件
实际上我们也可通过上面加载对应启动类下的资源方法SpringFactoriesLoader.loadFactoryNames中的loadSpringFactories方法里的classLoader.getResources(FACTORIES_RESOURCE_LOCATION);这个参数得到META-INF/spring.factories,路径如下:
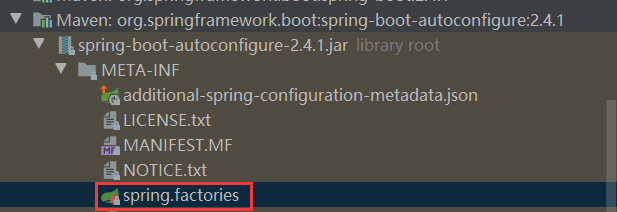
打开spring.factories部分内容如下:
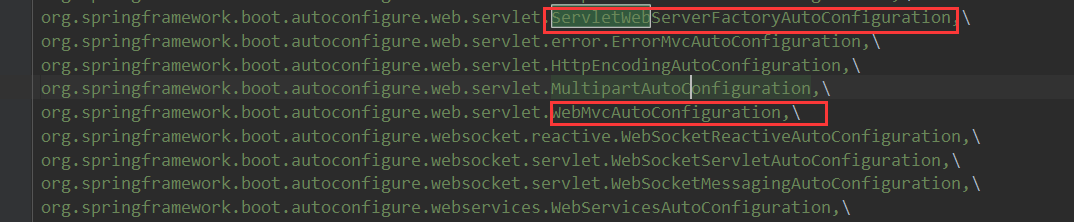
简而言之:就是通过上面1.2.2这个注解在启动的时候扫描并加载帮我们将META-INF/spring.factories下的自动配置类进行了遍历扫描,但是不一定生效,要判断条件是否成立,只要导入了对应的start,就有对应的启动器,有了启动器,我们自动装配就会生效,然后配置成功!
总结说明:
- springboot在启动时,从类路径下的
/META-INF/spring.factories获取指定的值。通过将这些自动配置的类导入容器,自动配置就会生效,帮我们进行自动配置!以前需要我们配置的东西,springboot都帮你做了! - 整合JavaEE,解决方案和自动配置的东西都在spring-boot-autoconfigure-2.2.0.RELEASE.jar这个包下。
- 从容器中(spring.factories)中能够看到存在需要XXXAutoConfiguration的文件(包含@Bean),就是这些类给容器导入了这个场景所需要的所有组件,并自动配置,包含@Configuaration。都是以JavaConfig的方式来进行配置!
- 有了自动配置类,直接免去了我们手动编写配置文件的工作!
原理分析思维导图见:01、自动配置原理分析
SpringApplication.run介绍
本以为只是运行了一个main方法,却是运行了一个服务
public static void main(String[] args) {
    //将springboot进行启用
    SpringApplication.run(HelloApplication.class, args);
}
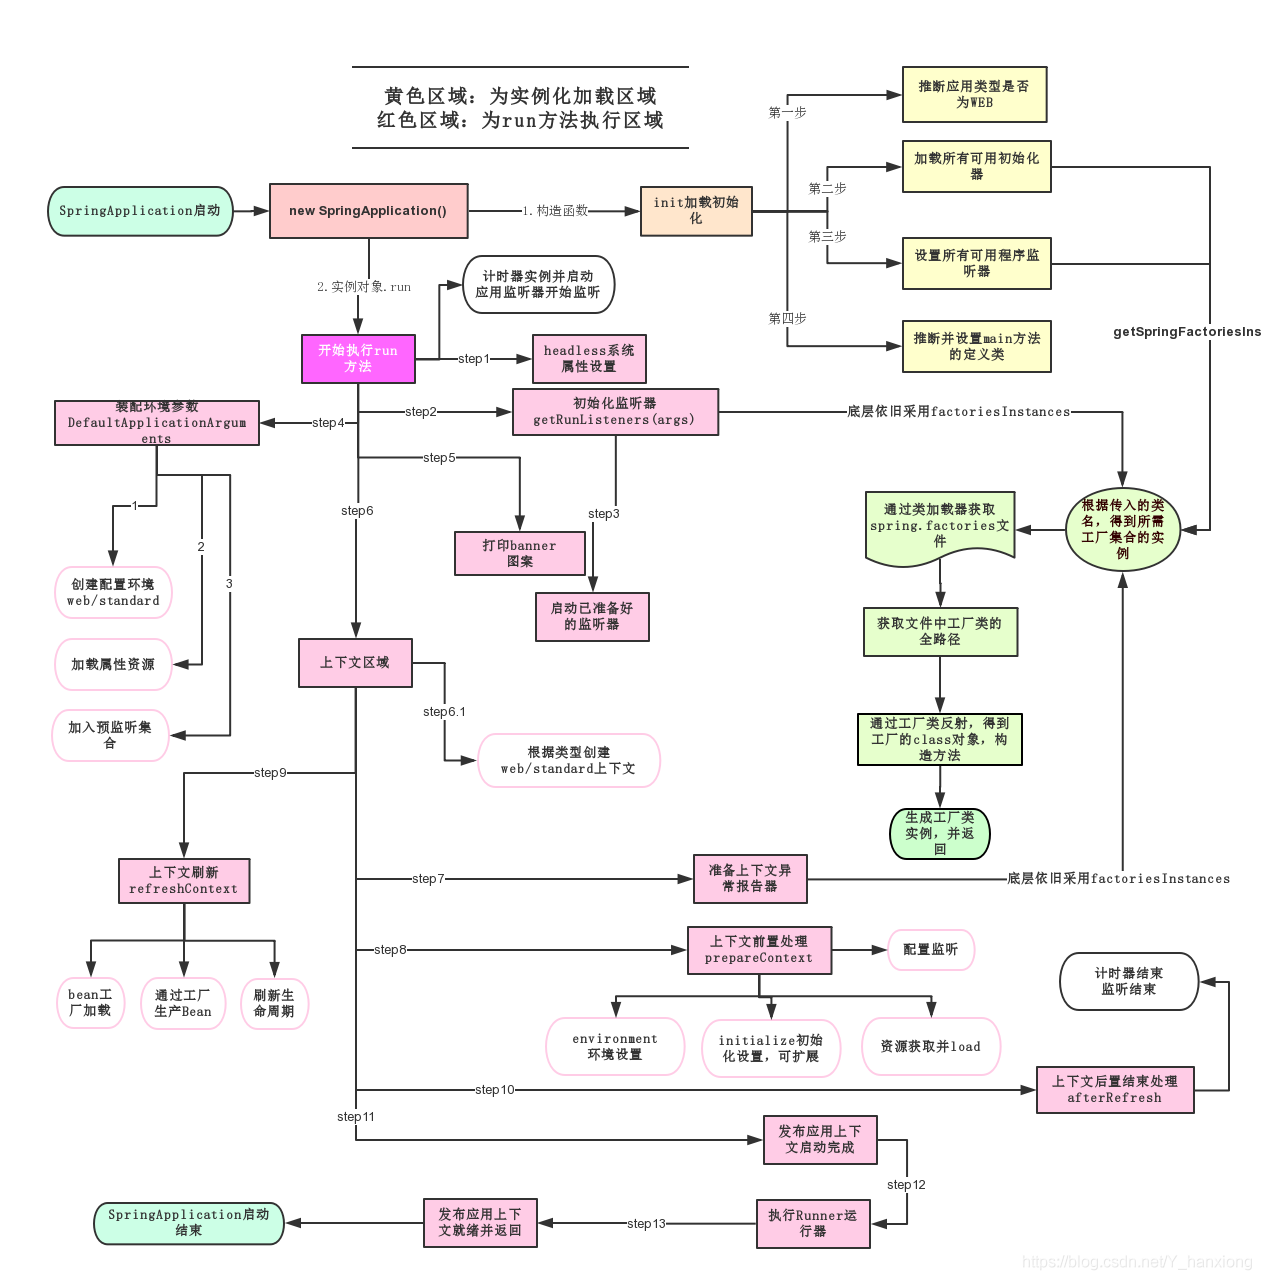
该方法主要做的事情是SpringApplication进行实例化以及run方法的执行。
该类主要做了以下四件事情:
- 推断应用的类型是普通过的项目还是web项目
- 查找并加载所有可用初始化器,设置到initializers属性中
- 找出所有的应用程序监听器,设置到listeners属性中
- 推断并设置main方法的定义类,找到运行的主类
关于springboot,谈谈理解:主要在自动装配与run()里谈,约定大于配置!
流程图如下
测试类
@SpringBootTest:单元测试类
//指定这个类是单元测试类:在这个类中能够自动获取IOC容器中的Bean
@SpringBootTest
class HelloApplicationTests {

    @Autowired
    private HelloController helloController;

    @Test
    void contextLoads() {
    }

}
实际开发中不会用到,随着项目越来越大,一般不会使用一个测试方法来检验代码!
五、配置文件
前提介绍
配置文件作用:修改SpringBoot自动配置的默认值,因为Springboot在底层都给我们配置好了
参考文档:配置文件Common application properties
我们先看一下三种配置文件
-
xml配置:
<server> <port>8080</port> </server> -
properties配置:
server.port=8080 -
yaml配置:
server:
	port: 8080
对于springboot提供两种常用的配置文件格式,分别是properties与yaml。
1、properties配置
常见的配置文件格式,Spring中经常使用这种格式,结构为key=value形式
# 单个属性
name=changlu

# 给对象属性赋值
server.port=8080
student.name=changlu
student.age=20

# list集合
lists[0]=list1
lists[1]=list2

# list集合写法2
lists=list1,list2

# map集合
maps.name=changlu
maps.value=value

# map集合写法2
maps[name]=changlu
maps[value]=value
注意:对于springboot来说一般推荐使用yaml而不是用properties
配置文件两种方式
两个资源:/src/main/java/com/changlu/pojo/Person /src/resource/changlu.properties
方式一:需要通过SPEL表达式来取出并注入到属性中
Person.class:
@Component
@PropertySource("classpath:changlu.properties")
public class Person {
    @Value("${name}")
    private String name;
    @Value("${age}")
    private Integer age;
    @Value("${happy}")
    private Boolean happy;
    @Value("${birthday}")
    private Date birthday;
    @Value("#{'${lists}'}")
    private List<Object> lists;

     ...空/有参,set/get方法
}
changlu.properties:
name=changlu
age=18
happy=false
birthday=2001/07/21
lists=list1,list2,list3
方式二:通过配置文件中的前缀来进行自动注入
Person.class:
@Component
//这里是设置对应配置文件中的前缀名
@ConfigurationProperties(prefix = "person")
//默认加载xxx.properties类型的配置文件,不能加载YML格式的配置文件,这里是直接指定对应的properties文件
@PropertySource("classpath:changlu.properties")
public class Person {
    private String name;
    private Integer age;
    private Boolean happy;
    private Date birthday;
    private Map<String, Object> maps;
    private List<Object> lists;
    private Dog dog;

    ...空/有参,set/get方法
}
changlu.properties:
person.name=changlu
person.age=18
person.happy=false
person.birthday=2001/07/21
person.lists[0]=cat
person.lists[1]=dog
person.lists[2]=monkey
person.dog.name=hashiqi
person.dog.age=10
person.maps[k1]=v1
person.maps[k2]=v2
2、yaml配置(推荐)
格式说明
yaml结构更加清晰,也是普通key: value键值对,对于:后的空格比较严格。
通过空格的缩进来控制层级关系,只要空格对齐则视为同一个级别,不能使用tab来代替空格。
大小写敏感,支持字面值,对象,数组三种数据结构,也支持复合结构
类型说明:
- 字面值:例如字符串(不加引号,单引号会转义字符)、布尔类型、数值、日期(支持yyyy/MM/dd HH:mm:ss)。
- 对象:键值对组成,如
key: value形式,:后必须有空格,每组键值对占用一行可以使用行内写法{k1: v1,k2: v2} - 数组:使用
- value形式组成,-后必须有空格,行内写法为[v1,v2,v3] - 复合结构:上面三组结构可以任意组合
yaml中格式:
# 字面量
name: changlu
date: 2020/12/21 14:17:20
# 字面量第二种方式
age:
 - 123

# 对象
student:
  name: changlu
  age: 15

# 对象的行内写法
student: {name: changlu,age: 15}

# 数组
pets:
  - cat
  - dog
  - pig

# 数组的行内写法
pets: [cat,dog,pig]

# map的行内写法  对应Map<String,Object> map
map: {k1: v1,k2: v2}

# List写法  对应List<String> list
list:
  - one,
  - two,
  - three
对应配置文件的实体类需要加上@Data以及@ToString
属性赋值
方式一:通过注解来进行赋值,通过@Value来进行赋值
@Component
public class Dog {
    @Value("旺财")
    private String name;
    @Value("3")
    private Integer age;

    无参/有参构造
    set/get方法
    toString()方法
}
方式二:对于一些配置来说,我们通过使用yaml来与实体类(组件)进行绑定值
注意你的pojo目录应当与启动类再同一个目录里
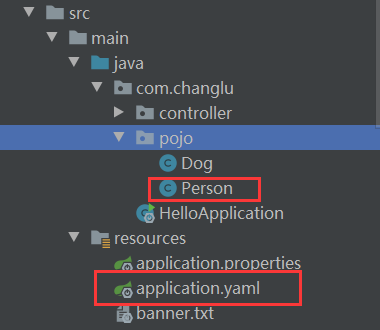
Person.class :
@Component  //创建bean实例
@ConfigurationProperties(prefix = "person") //通过找到application.yaml中person下的所有属性内容进行赋值
public class Person {
    private String name;
    private Integer age;
    private Boolean happy;
    private Date birthday;
    private Map<String, Object> maps;
    private List<Object> lists;
    private Dog dog;

    ...无参/有参 set/get方法
}
application.yaml:
person:
  name: changlu
  age: 18
  happy: false
  birthday: 2001/07/21
  maps: {k1: v1,k2: v2}
  lists:
    - cat
    - dog
    - monkey
  dog:
    name: hashiqi
    age: 10
问题:若是使用@ConfigurationProperties注解出现Generating Your Own Metadata by Using the Annotation Processor,
我们可以到对应官网查看解答:configuration-metadata-annotation-processor
解决:在pom.xml中配置,可能需要重启IDEA即可
<dependency>
    <groupId>org.springframework.boot</groupId>
    <artifactId>spring-boot-configuration-processor</artifactId>
    <optional>true</optional>
</dependency>
yaml其他使用方式
我们可以在yaml文件中使用一些类如
${}的springEL表达式来进行配置文件:
person:
  name: changlu${random.uuid}  # 可以使用spring的el表达式来自由设置
  age: ${random.int}
  happy: false
  birthday: 2001/07/21
  maps: {k1: v1,k2: v2}
  lists:
    - cat
    - dog
    - monkey
  dog:
    name: ${person.hello:hello}_wangcai  # 相当于三目运算符,若是不存在person,hello那么结果为hello_wangcai
    age: 10
结果:Person{name='changlubdde2a48-d5d4-49b2-a8a8-b9720b2c8539', age=-1136254345, happy=false, birthday=Sat Jul 21 00:00:00 CST 2001, maps={k1=v1, k2=v2}, lists=[cat, dog, monkey], dog=Dog{name='hello_wangcai', age=10}}
两个注入注解的比对说明
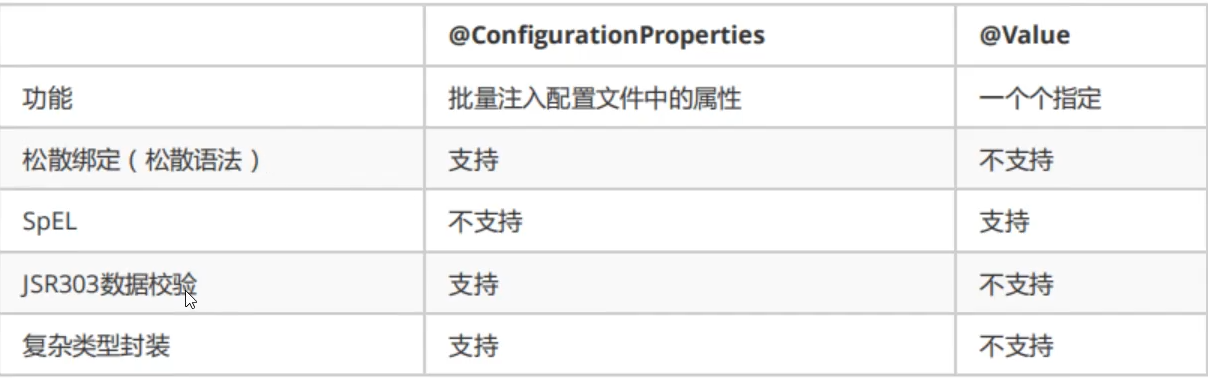
@ConfigurationProperties:批量注入
底层使用set方法来进行注入的,通过spring的前置处理器。
application.yml:
changlu:
  id: 18
  name: changlu
  url: https://e2tfu6fqrn.feishu.cn/docs/doccn0ZiE8u2oZ6OmPeBJP9lVec
自定义实体类:
@Component
@ConfigurationProperties(prefix = "changlu")  //根据前缀来进行批量注入
@ToString
@Setter
public class TestUser {
    private Integer id;
    private String name;
    private String url;
}

//测试
@SpringBootTest
class TestApplicationTests {

    @Autowired
    private TestUser testUser;

    @Test
    public void testSelect() {
        System.out.printf(testUser.toString());
    }

}

@Value:单个注入
底层是通过反射来注入到属性中的,在@ConfigurationProperties注入方式之前进行。
- 若是两个注解同时使用注入不同的数据内容,那么由于@ConfigurationProperties底层注入方式后注入,得到的结果就是@ConfigurationProperties对应注入值。(已进行测试)
yml配置属性就使用上面的。
@Component
@ToString
public class TestUser {
    @Value("${changlu.id}")
    private Integer id;
    @Value("${changlu.name}")
    private String name;
    @Value("${changlu.url}")
    private String url;
}

//测试
@SpringBootTest
class TestApplicationTests {

    @Autowired
    private TestUser testUser;

    @Test
    public void testSelect() {
        System.out.printf(testUser.toString());
    }

}

结论
通过上面实践,我们无论是使用yaml还是properties都可以通过一定的方法来获取到值,强烈推荐使用yaml。
情况1:若是我们在某个业务中,需要获取配置文件中的某个值,那么可以使用@Value()来确定单个属性值
情况2:若我们专门编写了一个JavaBean和配置文件进行映射,就直接使用@ConfigurationProperties!
3、JSR303数据校验
介绍及导入
@Validated:如果数据异常则会统一抛出异常,方便异常中心统一处理
使用@Validated注解,来开启下面的注解的使用:
pom.xml中导入依赖:
<!--导入JSR303校验相关的jar包-->
<dependency>
    <groupId>org.springframework.boot</groupId>
    <artifactId>spring-boot-starter-validation</artifactId>
</dependency>

常用功能介绍如下
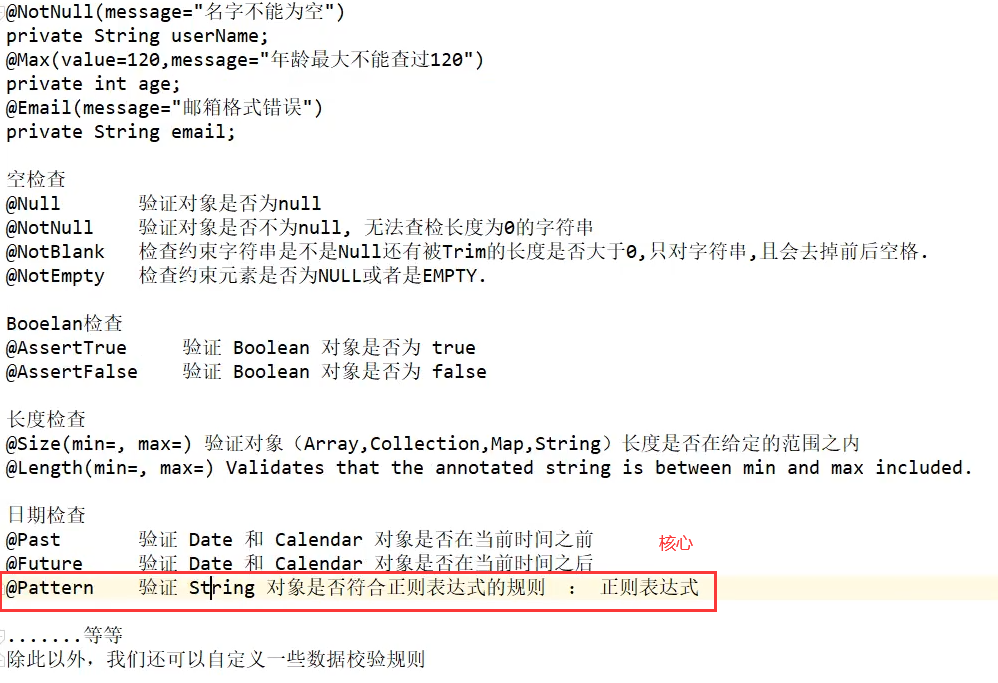
实际使用(@Email)
这里我们使用@Email来进行检验一下
@Component
@ConfigurationProperties(prefix = "person")
@Data
@ToString
@Validated //数据校验
public class Person {
    @Email
    private String name;
    private Integer age;
    private Boolean happy;

    ...set/get方法  无/有参构造  toString()方法
}
Application.yaml:
person:
  name: changlu${random.uuid}  # 可以使用spring的el表达式来自由设置
  age: ${random.int}
  happy: false
运行一下,看到校验的结果:

我们也可以自定义对应的提示信息,如@Email(message="您输入的不是合法的邮件地址!")

IDEA的FileEncoding问题
设置Settings中的File Encodings中的Encoding为UTF-8格式:防止之后打开项目中的配置文件有乱码情况

六、配置优先级及多环境配置
1、配置优先级
springboot启动会扫描对应下方位置的application.properties或者yaml文件作为springboot的默认配置文件
我们可以在项目的不同位置来进行配置springboot的配置文件,如下:classpath
- The classpath root
- The classpath
/configpackage - The current directory
- The
/configsubdirectory in the current directory - Immediate child directories of the
/configsubdirectory
具体说明可以见springboot官网:External Application Properties
说明:classpath指代三个路径 src/main/java src/main/resource 第三方jar包路径;directory指的就是项目
对于配置文件我们对于classpath一般都是放置在src/main/resource目录下的。
测试:我们将配置文件设置在不同的目录下设置不同的端口号来进行优先级测试,这里仅仅使用yaml配置文件,properties配置文件同理
测试后优先级如图:
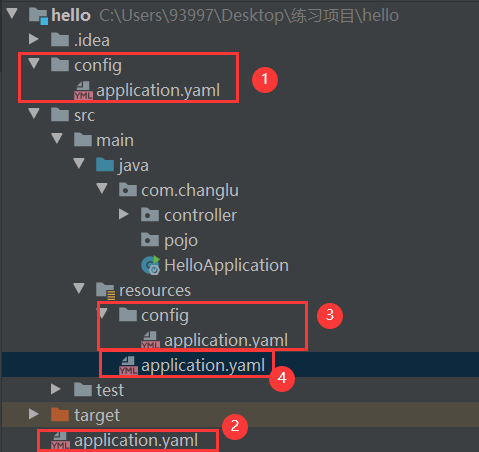
总结:
- 无论你是使用yaml还是properties在不同目录下其优先级与上图相同;
- 若是在同一个目录下有properties与yaml配置文件,yaml配置文件更加优先!
2、多环境配置
目的:对应实际开发中,我们对于一个项目会在多个环境下运行,如普通环境,测试环境,生产环境,那么我们应当事先进行多环境配置,根据对应环境来进行选择配置。
properties配置文件
此时我们对应多个环境准备了多个配置文件,那么如何进行配置来进行选择相应的配置文件呢?

我只要在properties中使用spring.profiles.active来进行动态加载对应配置文件,其值为application-xxx.properties后的xxx即可
server.port=8091
# 使用的是application-test.properties配置文件
spring.profiles.active=test
缺点:需要多个配置文件占空间
yaml配置文件
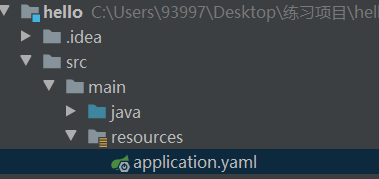
对于yaml我们只需要一个配置文件中设置即可,通过使用---来作为分隔表示为多版本:
- 其中
spring.profiles.active用来动态加载对应环境的配置,这里加载的就是下面的环境
server:
  port: 8091
spring:
  profiles:
    active: dev

---
server:
  port: 8092
spring:
  config:
    activate:
      on-profile: dev

---
server:
  port: 8093
spring:
  config:
    activate:
      on-profile: test
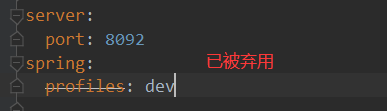
说明:在设置其他环境配置出现这个标志,原因是我们现在使用的是springboot 2.4.1版本,这个方式已经弃用,应当使用上面的最佳写法来设置环境名称。可查看文档:Config file processing in Spring Boot 2.4
七、自动装配原理
探索spring.factories
我们从spring.factories中进行探究其中的原理
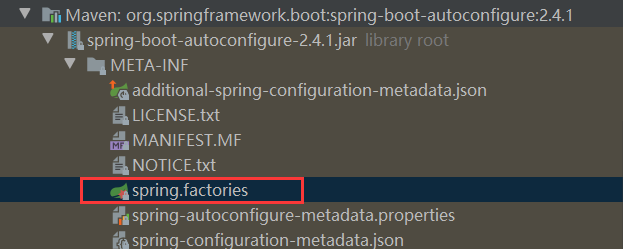
我们选择其中的一个Configuraction来进行分析:

// 表示一个配置类,都会被spring接管配置
@Configuration(proxyBeanMethods = false)
// 自动配置属性
@EnableConfigurationProperties(ServerProperties.class)
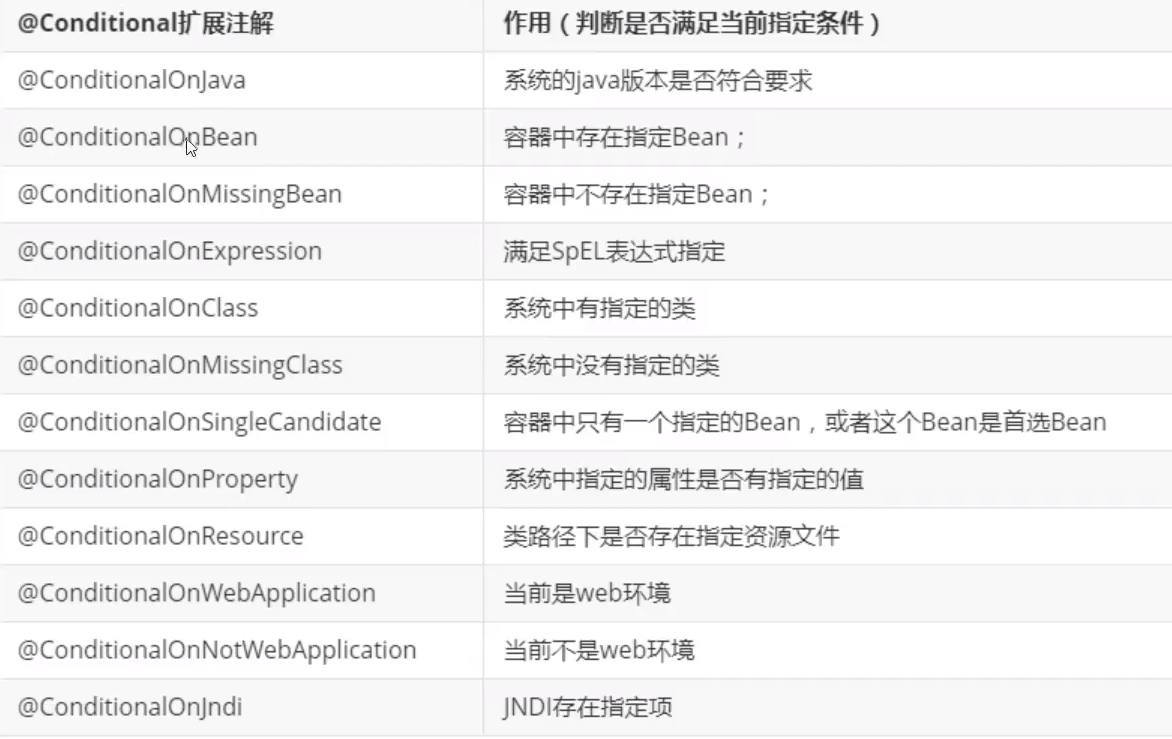
// spring的底层注解,根据不同的条件,判断当前配置或者类是否生效,下面能够使用许多@ConditionalOnxxx的注解
@ConditionalOnWebApplication(type = ConditionalOnWebApplication.Type.SERVLET)
// 系统中是否有指定的类
@ConditionalOnClass(CharacterEncodingFilter.class)
//系统中指定的属性是否有值
@ConditionalOnProperty(prefix = "server.servlet.encoding", value = "enabled", matchIfMissing = true)
public class HttpEncodingAutoConfiguration {
	...
}
我们点进上面@EnableConfigurationProperties(ServerProperties.class)中的ServerProperties.class类中查看:
@ConfigurationProperties(prefix = "server", ignoreUnknownFields = true)
public class ServerProperties {

   /**
    * Server HTTP port.
    */
   private Integer port;

   /**
    * Network address to which the server should bind.
    */
   private InetAddress address;
   ...
}
能够注意到该类使用了@ConfigurationProperties注解,是用来将对应配置文件的前缀的属性自动装配到类中的属性中去
我们看一下还有哪些@Conditional扩展注解
简而言之:
-
也就是说我们在配置文件中配置的一些值,其实是本来就写好的一个配置文件,在springboot程序启动时会首先默认加载那些配置类,接着那些配置类会去加载对应的配置文件,而我们之后仅仅只需要更改对应配置文件的值即可!!!!
-
通俗点就是我们原先需要在bean中手打的属性(property)封装成一个类,然后通过yaml文件注入,而我们在application.yaml文件中自定义这些property属性
精髓:
- springboot启动会加载大量的自动配置类
- 我们看我们所需要的功能有没有在SpringBoot默认写好的自动配置类当中
- 我们再来看这个自动配置类中到底配置了那些组件(若是要用的组件存在其中,我们就不需要手动来配置)
- 在容器中自动配置类添加组件的时候,会从properties类中获取某些属性。我们只需要在配置文件中指定这些属性的值即可!
xxxAutoConfiguration:自动配置类,用于给容器中添加组件
xxxProperties:封装配置文件中相关属性,与对应类来进行绑定
debug=true使用
在yaml中配置查看详细的自动配置报告,启动时看到日志输出,哪些自动配置类生效,哪些没有生效。

debug: true
启动程序来进行查看配置是否生效的日志信息:
============================
CONDITIONS EVALUATION REPORT
============================

# 第一类:已经配置且生效的配置类
Positive matches:
-----------------

   AopAutoConfiguration matched:
      - @ConditionalOnProperty (spring.aop.auto=true) matched (OnPropertyCondition)

   AopAutoConfiguration.ClassProxyingConfiguration matched:
      - @ConditionalOnMissingClass did not find unwanted class 'org.aspectj.weaver.Advice' (OnClassCondition)
      - @ConditionalOnProperty (spring.aop.proxy-target-class=true) matched (OnPropertyCondition)

   DispatcherServletAutoConfiguration matched:
      - @ConditionalOnClass found required class 'org.springframework.web.servlet.DispatcherServlet' (OnClassCondition)
      - found 'session' scope (OnWebApplicationCondition)

   DispatcherServletAutoConfiguration.DispatcherServletConfiguration matched:
      # 表示已经找到
      - @ConditionalOnClass found required class 'javax.servlet.ServletRegistration' (OnClassCondition)
      - Default DispatcherServlet did not find dispatcher servlet beans (DispatcherServletAutoConfiguration.DefaultDispatcherServletCondition)

...

# 第二类:没有匹配到,未生效的
Negative matches:
-----------------

   ActiveMQAutoConfiguration:
      Did not match:
         - @ConditionalOnClass did not find required class 'javax.jms.ConnectionFactory' (OnClassCondition)

   AopAutoConfiguration.AspectJAutoProxyingConfiguration:
      Did not match:
         - @ConditionalOnClass did not find required class 'org.aspectj.weaver.Advice' (OnClassCondition)

...

# 其余除外的类
Exclusions:
-----------

    None


# 无条件的类
Unconditional classes:
----------------------

    org.springframework.boot.autoconfigure.context.ConfigurationPropertiesAutoConfiguration
评论区请在客户端页面查看